Monday, June 8, 2009

Ghetto Fence and Canned Ham

Our little 1956 Aloha trailer has been sitting in my parent's driveway for 2 years. With subtle and not so subtle hints from my folks, we determined it was time to move the canned ham home. But where to put it? Our place does not have RV parking and our driveway is barely big enough for our cars. The side yard is big, but were unsure how to get it back there. Would it fit between the fence and the house? Would it clear the overhang on the roof? Could we make it up the steep driveway without scraping the bottom of the trailer? OR rip off the tongue and hitch? The existing fence/gate looked deceptively small. I thought there was no way to get a car through the gap... let alone a trailer? We measured. Then we measured again to be sure, and found that it was plenty wide enough to fit the trailer through. The old fence had to go.

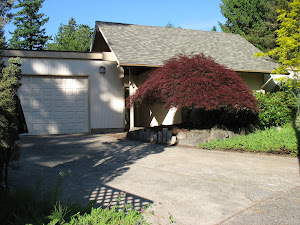
Step 1: Clear the bark from the side yard.

Several weeks ago we discovered aggregate concrete existed under a thick layer of bark on the side of the house. With shovels and wheelbarrow we started the lovely task of removing the bark chips. Unfortunately the concrete is not as large as we thought, but big enough to park a trailer on.


Step 2: Remove the existing fence.
Steve and Max made quick work taking down the fence. The old fence boards were still in pretty good shape so we saved them for future use... possibly a new fence (sans the lattice) since the neighbor's wisteria "Plant From Outer Space" is consuming the existing one. With the fence out, the shrubs and rocks had to be moved from the parking strip next to the driveway. Yikes those are some very big rocks! And we think the huge lump of rock and cement in the corner is the sad remains of the old lava rock mailbox base. Yes, it is VERY HEAVY.


Step 3: Build temporary fence.
We have no idea what kind of permanent fence we want to build... but because we have a pool in the backyard something had to go up. Solution: The Ghetto Fence! With a couple 4 x 4's, concrete deck footings, a few 2 x 4's, a couple packages of reed fencing, screws and a power staple gun we threw up a quick fence. Not bad for a quick fix. (Although a gate would have been nice... maybe a ghetto retro-fit is in order.)


Step 4: Park trailer... Trailer park.
I seriously thought we'd argue to the point of divorce squeezing this trailer in next to the house, but to my surprise we rolled it right into place with little difficulty. ("little difficulty" ...hmmm. Actually with considerable difficulty and luck. I have almost NO experience backing up a trailer. I got lucky, plain and simple. And our martial bliss prevailed.) And with lots of room to spare on both sides. (Maybe our 1956 Airstream Safari will fit here... it's a couple of feet longer, but the same width. Awww, yet another project sitting in storage!) Outcome: we're very happy... and still married!

This trailer is so cute. We are definitely planning a few getaways this summer.

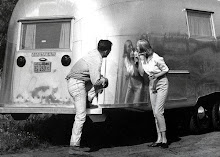
I thought I would add a quick side note about my trailer obsession. We bought the 1956 Airstream Safari (pictured below on the day we got it and Max driving the "tow vehicle.") almost on a whim, after seeing a segment about Vintage Vacations on the Travel Channel (I think). It is truly a beautiful design, but needs a few things (the plywood floor was rotten and most of the interior needs rebuilding). You don't see many '56 Safari's and I'm kinda scared of messing it up.

The trailer pictured above is also from 1956 and has an aluminum skin, but it's an Aloha made in nearby Aloha Oregon. It's usable but also needs some work (there's some rotten wood here and there, it needs a new vent, some trim work and assorted bits & pieces). Instead of subjecting it, myself and my family to the complete restoration this trailer deserves, I'm planning on keeping it roadworthy, learn how to polish aluminum and deal with other vintage trailer stuff and eventually sell it to another vintage trailer aficionado and put the $ toward stuff the Airstream needs.

That's my plan.

Friday, June 5, 2009

Solair Chairs... Very Cool Patio Chairs!

Designer: Fabiano and Panzini
Manufacturer: IPL, St.-Damien, QC

This indoor/outdoor chair had a long production run, from the 1960’s to the 1980’s. With it's classic styling and increased demand Industries Émile Lanchance Ltée in Canada has reissued these fantastic chairs.


These chairs are awesome... and NO ONE sells them on the West Coast until NOW! If you want some contact me and I'll send you the information. They are available in 6 colors: white, aqua, orange, yellow, bright pink and beige.

Wednesday, June 3, 2009

This is it!!!

Where can I get this umbrella? This is exactly what I was looking for last fall. http://greshamrummerfun.blogspot.com/2008/10/summer-dreams.html


Check out this place! It is simply amazing.
Now I feel like crap. Noooooo! I'm not jealous... take it back.
http://www.dallasobserver.com/slideshow/view/15057368/9

Cloudy Grout Scum

Looks like we will finish up grouting the pool tile tonight. Just have the lagoon and one skimmer left to complete. Health issues and appointments have slowed us down this week, but we're still on schedule to fill the pool this weekend. Yippee!


I love the grout lines... it is the DIY tiler's best friend. This is BEFORE I cleaned off the cloudy grout scum. (I just want to say cloudy grout scum one more time!) I'll post final pics when it is completely finished.

Tuesday, June 2, 2009

Frankenstein Deck... Bringing it back to life.

We have lots 'o deck... maybe 1200+ sq. ft. I know!

Question: how many suitcases of money did it take to build?
Answer: about 40K.
Bottom line: we could never afford to replace it!
Action plan: attempt to bring this sorry looking deck back to life... somehow. (fingers crossed)


The deck had been very neglected the last few years and we worried that it may be beyond saving. With the help of some 30 Seconds Outdoor Cleaner and a pressure washer we began the Frankenstein deck experiment. This 30 Seconds stuff is amazing! It takes about 1 gallon/100 sq. ft. We bought two 5-gallon containers to start, followed the instructions on the label and jumped in.

Outcome: we are pleasantly surprised at the vibrant, nearly new look of the deck.


What a difference! The pressure washers chewed up a little of the surface. To keep our feet as splinter-free as possible we'll rent a floor sander to smooth it down before we seal the wood. The main back decks are done. Still need to clean the sides, the deck overlooking the green space (this one is pretty bad), the path up to the pool house and the pool house deck. We will also use the same cleaning process on the aggregate patios, walkways and driveway then seal with a wet-look concrete seal. Should be fabulous when all done... good thing I love the pressure washer!

Monday, June 1, 2009

Progress on the pool

Max is an animal at removing the old tile. Some came off with just a tap tap... others worked best with a screwdriver as a pry-tool... but it was most fun to just whack at it with a hammer and watch the pieces fly.
IMPORTANT SAFETY NOTE: Ceramic shards cut skin quite nicely. (We all had our battle wounds from flying tile shrapnel. Wear gloves and safety goggles... also, keep a stack of Band-Aids handy.)
The old tile is gone and all the water has been removed, but it's not ready for new tile yet. The old mud and grout need to be removed!
Note from Steve:
And don't worry about that water... if you look at the large version of this pic you'll see six holes in the wall and I had just taken out one of the plugs. Two are for the current pump system- one takes dirty water to the filter, another shoots clean water back into the pool. When you plug up the return hole that diverts water to the upper pool area and the waterfall. I have NO idea what the other 4 holes are for. I've tried every combination of open/close with them and my best guess is that they're from the old pump system and the pervious owner just left the holes.


We tried scraping, wire brushing and pressure washing... none were successful at removing the old cement and grout. After a quick google search we found that another DIY pool tile person has used a 4.5" grinder with a masonry bit... and YES! It did the trick. It was messy and took Steve one day to grind down the tile base.

We also had to smooth out the lagoon. The plaster surface was installed over the old tiles. Steve cut into the plaster, removed the tile chucks and rounded over the thick part of the plaster. Not perfect, but will work great until it's time to resurface the pool. And a smooth, continuous line looks a lot better than before.

With the surface prepped and smooth, Steve applies a skim coat of cement to the border.

First tiles go up! Yup, that is a very blue/green border. I love it and it really will brighten up the pool.

The transition from the pool to the lagoon was tricky. The lagoon doesn't have the aggregate coping at the top. To keep the visual line of the aggregate we decided to add a dark grey mosaic blend to the top. It works really well and eases the transition from pool to lagoon a little better.

We spent hours laying on our stomaches nipping individual tiles to fit the curve of the pool. This is all under water, but I know it would bug me if it wasn't done right. No one will see it, but we know we like it!

The finished lagoon with grey border. Awwwww. We pre-sealed the tile yesterday and will start grouting tonight. We hope to have the pool filled by this weekend. (fingers-crossed!)