Tuesday, February 5, 2019

Kitchen Counters and Backsplash

We have lived with temporary countertops for way too long! White quartz was always our choice for the countertops, but we couldn't decide on the backsplash tile. So... we waited... and waited!

Originally we though we would want a 2x2 ceramic tile. Mostly white with a splash of color randomly placed throughout.


Original Kitchen Concept

After years of research and living with the kitchen layout, we have narrowed down the tile design to white quartz counters with white subway.


Inspiration

I know!!! How predictable. BUT... we aren't as boring as it may appear. We do want subway style in a 3x9 inch size. We do want them to be white, or at least a white that matches the quartz countertops. HOWEVER, we have discovered dimensional tiles. Yep. Tiles that have a slight raised geometric pattern in them.

We absolutely LOVE the dimensional tiles created by Heath Ceramic.


Traditional Subway Tile Layout


Heath Ceramics Dimensional Design Options

These sleek 3x9 Oval Dimensional tiles are modern and add a sense of interest and texture to a completely white palette. I seriously can't love these anymore that I already do. HOWEVER, there is one drawback... one very big drawback. These beauties cost $78/sf. That's right. SEVENTY-EIGHT DOLLARS. Our backsplash area is about 13' x 2.5'...doing the math, it was clear we needed alternatives. 


This is a great choice, but I have yet to find out the cost. It may be even more than the Heath Tiles, but I really am digging the classic brick layout. The texture of the dimensional tile really creates an interesting pattern. The product spec sheet outlines other designs and layouts in the line. I will update cost once I visit the showroom. (Today is a snow day... so I'm will trek downtown once we thaw.)


Classic Brick Layout—Horizontal

Now, as cool as this layout is, turning it vertical gives it a completely different feel. I really like how the vertical layout breaks up all the horizontal lines and begins to create a completely different look using the same tiles. 


Classic Brick Layout—Vertical


These are not quite as interesting, but a very viable option. The big plus is that these babies are in stock as our local tile store: Classique Floor & Tile

I think this could work in the traditional stacked, horizontal brick, or vertical brick layout. I really need to see these in person, because the white option may not be white enough... it kinda looks grey. Hmmmm. 

Frame A 4 x 8 by Pratt & Larson


The frame is recess so the middle section is relief. My main concern after the color, is the thought a wall of these tiles may look like Legos®. NOT what I'm going for... So let's keep looking.


These tiles are interesting. They run about $21.50/sf... which is less than 1/3 the cost of the Heath Oval tiles. Not the same, but point us in the right direction. 


Traditional Stacked—Byzantine Bianco 3D Subway Tile

By simply adding a flat 3x9 tile ($16.95/sf) into the layout, the design starts to create a fantastic pattern. Now... we're getting somewhere. This is AMAZING and I will order a sample to see if this is a good color match to the quartz counters we have selected. WOW. WOW. WOW... just ordered the sample! 

This may be the winner!


Once I have the samples in front of me, I will have a better idea which way we will go with the backsplash. I am really liking both vertical and horizontal layouts. The mock concepts give me an idea, but I will need to hold these in place to get the best feel for the space. 


Decisions. Decisions. 
BUT... yeah... those Oval Dimensional tiles from Heath Ceramic... 
Oh. My. Heart! 💙

-Haley


Friday, December 14, 2018

Fixing a beam!


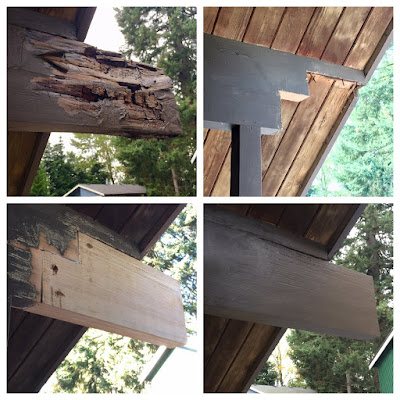
This style of Rummer was originally built with beam ends sticking out at the peaks and at the lower ends of the roof. Sticking out anywhere from 9-12 inches. When new, our house had eight of these in total. Long before we bought the house the four beam ends at the peaks had been cut flush and covered with metal flashing. All four lower beams are still there and all are experiencing some degree of rot. They've been exposed to the elements for 42 years. Painted, but no galvanized steel caps. Rot settled in many years ago and started doing its thing.

When you're not sure how to fix something, it's amazing how long you can pretend it's just not there. And the longer you "forget" about it, the worse the problem becomes. After all, the beam ends that stick out aren't really structural, so no big deal, right? Ummmm...no. 

Because it's the most visible, we chose to start with the worst one. 


YIKES!!! Seriously...the only thing holding it together was paint (Rodda Oxford Brown, of course). 
So how do you fix that crumbling mess? I had NO idea! Tear into the front of the house and replace the whole beam? Make a box beam? Get creative with epoxy?
Luckily we have The Eichler Network. It's a great resource and they have an article on this very topic. If there had been structural integrity at stake, I would have consulted a pro. But this is replacing a non-structural beam end and the steps seem fairly straightforward. 
1- Remove the rotten section of wood
2- Cut a new piece that fits in just right
3- Attach it
4- Fill and sand any gaps/seams
5- Paint it 
You're done
How hard can it be, right? Let's give it a shot!


1- Remove the rotten section of wood. 
Luckily for us, access is pretty easy -- but it's still about 8-feet off the ground so I would need to stand on a ladder. After considering a few saw alternatives, I decided to wield a reciprocating saw. The rot went further into the beam than I expected, but after about 1/2 hour of cutting and 32-inches later, I found "the good wood." 


2- Cut a new piece that fits just right
This is kinda tricky. I was cutting the bad stuff out with a hand-held reciprocating saw, on a ladder, with sawdust and rotten wood chunks raining down on my face, so the finished cuts aren't super exact. I fixed up the ends as best as I could using my grandpa's old belt sander and 40 grit sandpaper, then traced a template for the new piece on some cardboard. It still took plenty of "adjusting" to make the new piece fit snugly. 


3- Attach it
Glue? Lag bolts? Epoxy? Hmmm.....
I talked with the guys at the lumber yard and they suggested we use 4-inch, hardened, galvanized, lag-screws and toenail it together. They thought 4 would be enough, but I used 6. I pre-drilled the holes, then made them larger to countersink the screw heads.


Then I put the screws in until they were almost all the way through the new piece, applied a bunch of waterproof wood glue to both new & old surfaces, got some help to hold it in place and screwed everything together.   


4- Fill and sand any gaps/seams
I used that old belt sander with 40-grip paper where it was really out of wack (1/4-inch off at the worst spot...seems the original beam has a bit of a "cup" to it), then I used a smaller (lighter!) sander to lower the high spots and save my shoulder muscles.
For building up the low spots and filling in the seams and screw head holes, I used Bondo. It's great stuff. Just mixed it up in small amounts, glopped it in there, smoothed it out as best as I could, let it all dry, sanded it smooth, and repeated the process until it looked right.
If you try this, wear safety glasses!!! And maybe a mask, too. That dust gets everywhere! 


(SORRY! I thought I had pictures of this phase...but I can't find any. Just imagine the above pics, only smoother and with Bondo filling up the gaps and screw holes.)

5- Paint it
First a little primer...

...open up the Oxford Brown...

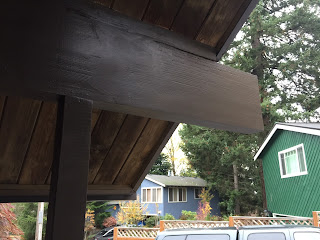
...and finish up with a nice paint job. 


This was NOT an easy job. But it turned out really nice and it's SO great pretending not to see that rotten stump of a beam we lived with for so many years.
One beam down. Next up...the peaks! That'll be super tricky....


via GIPHY


Monday, March 16, 2015

Minecraft Rummer

We have a daughter in college who seems to be spending a lot of time playing games... Maybe too much time! Here is our home recreated in the Minecraft style (circa 2015).


Front View


Back View


Front Entry and Atrium


Logia and Living Room


Living Room and Dining Room


Kitchen and Family Room


Roof View


Now, back to reality. The weather is warming and we are looking outside at all the project that are waiting for us. We have completed quite a bit in the backyard and will post some updates as soon as we have the spring clean up complete.


Thursday, February 19, 2015

Fixing a wall... with cooled LAVA!

Well I finally did it... I went to work on repairing the lava rock wall that's been crumbling since we bought this place.
In looking at the wall, it appears that many people have tried their hand at repairs. It's not a task for the timid. Not only do you have to mix mortar, but you need to tint it so it'll blend in with the still-standing sections.


This is the AFTER shot... I couldn't find a good BEFORE, but even better... can you spot the 5 pieces that are new? 


Add a BOSKO Tiki, traditional dresses, and it's perfect for selfies!


We had 100+ guests stop by for a quick dip in the pool. Tiki Kon 2014... this was back in July of 2014.