Monday, November 30, 2009

Sheetrock finishing

I was conflicted about taking on this remodel challenge.

On one hand, our contractor told us that unless we used the sub-contractor she sent out to give us an estimate (of $1,500... original guestimate was $700), the cabinets wouldn't hang right, we would be unhappy and have to tear it all out and start over, which would cost us even more money.

On the other hand it looked so simple, most of the sheetrock would wind up being obscured by cabinets, tile and/or appliances and I do have a little experience with sheetrock*. After giving all the walls a coat of primer, I'm confident the cabinets will hang just fine.


We painted the beams, too... first the white primer, then two coats of Rodda Oxford Brown.


Today, the finished flooring is being installed. I hear that we're going to need about 75 pounds of floating compound. I can't wait to see how it looks!

*Our first home was a 1912 bungalow. We had a baby on the way and since the upstairs wasn't insulated, I tore into the baby's room to insulate, weather-proof and update some of the electrical. It was a room with angled ceilings, a dormer, double-hung window and a pony wall. Nothing was even close to being square. I ended up having to use a lot of mud to fill in gaps, but when it was finished it looked great and our little baby girl had a nice, toasty space for her crib.

Monday, November 23, 2009

My so-called weekend.

Haley got a bee in her bonnet about getting stuff done. And it's a good thing too, because we went almost a whole week without any progress at all. Anyway, after a few phone calls and a few trips to our local Big-Box Home Store I had a very busy weekend planned for me. Here are the highlights:

Saturday- Subfloor! We will be installing VCT just like this, so an absolutely smooth surface is required. Any teeny tiny imperfections will transfer through and since we have many imperfections, we went with 1 1/16" thick tongue & groove plywood. It's THICK and heavy, but the height should match up with the other finished floors, and with the number of ringed nails we used, I don't think that floor is going anywhere for a long long time. It feels SOLID!


As many of you who have stopped by may have noticed, our home is NOT level... the back left side of the house has sunk a few inches. It's not really noticeable with furniture in the room, but when it's empty you feel like you're here, or maybe here. Okay, it's not THAT bad (if it was, we could charge admission!) but having some really heavy, not so flexible subflooring will sort of help everything even out. At least that's my hope.

Our original flooring "guess-stimate" was $700. The first bid was for $7,500 with $4,500 of that going to subfloor installation! Huh?!! Another bid came in at a much more reasonable $1,500. Still eager to save, and considering I already have subfloor experience, we decided to hire a couple of very able handymen, I would chip in where needed and we would just get it done. We wound up spending a whopping total of 5 hours and $600 on the subfloor. I still have to float a few areas to close up a few gaps and level out a transition or two, but it will be ready for the final floor to be installed on Monday.

Sunday- Sheetrock! And plenty of it. We had a bid of $1,500 to put in the sheetrock. That's just kooky! I bought $100 worth of sheetrock, another $100 for tape, mud & screws and asked a couple of amigos to spend a Sunday getting it up on the walls. Between the three of us it's up, and it looks great. Out handyman pal came in on Monday to handle the mud & tape duties and voila!... we saved a cool thousand dollars.


It's a good thing we handled this ourselves, because when the time came to pull off the old water valves, we discovered they were very very corroded. The valves themselves were not too horrible, but the threaded metal thingies they were screwed on to were beyond saving. We had to heat the connection up, clamp on Vise-Grips and unscrew them by tapping with a hammer. The replacement ones I got are brass, so hopefully further corrosion won't be a problem.


We are still over budget and it looks as though a few things will have to sit on the "to be installed when funds allow" list: drawer microwave, in-counter food processing center, and ??

We haven't decided on countertops yet. Formica is cheap, Coran is possibly barely affordable, and quartz is too expensive. (We forgot to include that on our initial estimate list... along with a new sink and water fixture... oops.)

Next... finishing sheetrock & paint/primer.

Happy Thanksgiving everyone!

Monday, November 16, 2009

It's all in the planning

Even though the studs are still bare, the sub-floor isn't down yet and the electrical is only roughed in, I think it's safe to say that we are on the home stretch. I also think it's okay to start a list of things we've learned along the way.

1- Be careful with your time and dollar estimates. Our mistake was that we sat down with our contractor and penciled in rough cost estimates ("Let's see... sheetrock should be about $700, flooring and subfloor should be about $1,500, electrical will be like $1,500..." etc.). Based on that number, Haley and I started the kitchen remodel with a finite pile of money and a Thanksgiving deadline in our heads. The actual bids & estimates have ALL come in at close to double our original not-so-educated-guesses. (Sheetrock estimate: $1,500 VCT Flooring/subfloor estimate: $7,000!!! Electric estimate: $2,400)
Lesson learned- Even when you are in the initial planning phase, don't base the cost of your design on "educated guesses." Put your plan down on paper and get real bids from sub-contractors, or be prepared to roll up your sleeves and do some work yourself.
How we adjusted- We had to take on a few more projects ourselves (all demolition, subfloor, ...). The money we save there is used to cover the higher than expected estimates. (NOTE: I'm not saying that those bids were too high, but they are significantly higher than we expected them to be.)
Trade off- Time and sore muscles. I don't have a month of spare vacation time at my work, so I have to handle these jobs in the evenings and on the weekends. I'll get things done, and they'll be done right, it just takes me longer than the pros.

2- Stick to your guns. If someone tells you what you're asking for is going to be "hard" or says "I don't know how you would do that," push them once with a possible solution and show them pictures. If that doesn't do the trick, find someone else. Example: Our cabinet design isn't based on typical/conventional configurations. We want "odd" things like a metal trim piece along the bottom, all base cabinets raised 8" off the floor on metal legs, sliding masonite (or pegboard) doors on a spice cabinet near the cooktops, vintage Thermador appliances installed, etc.. A normal cabinet guy will balk at nearly everything. An experienced cabinet guy will say things like "Neat idea," and "Here's a way those sliders will work better." Go with the experienced guy.
Lesson learned- Don't be afraid to say things like "But that's not how we want it," and "Can you try it again, maybe more like this?" No matter how nice and polite you try to be, you'll still likely frustrate the contractor and the subs, but in the end you'll get what you want and they will have learned something new.
How we adjusted- We had to be creative in our presentation and be willing to delay.
Trade off- Time... and dealing with a frustrated contractor and subs.

3- Your gut instinct is probably correct. You can tell if someone "gets it" or doesn't. If your gut is telling you that he doesn't, be prepared to engage in some heavy "art direction" every step of the way, or keep looking.

Remember: You will be living with your kitchen (or bathroom or whatever) for a looong time. To them, it's just another job and unfortunately they will probably be more concerned with "what's the easiest/fastest way I can get this done" as opposed to "how can I make the design of the guy who's paying me a reality."

Wednesday, November 4, 2009

Office floor

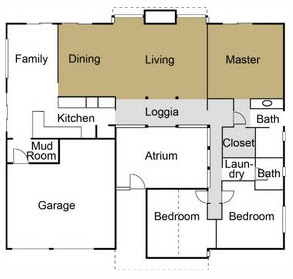
As you can see on the floorplan over there --> there's a small nook (mud room) you go through to get to the garage from the kitchen. At one time we thought about turning it into a 1/2 bath, but it makes a nice (albeit small) home office and Haley wants to keep using it as such. No problem, right? Riiight.

We've always kind of assumed that a previous owner took a chunk out of the garage to make the space and that appears to be the case. No problem. BUT the garage floor is about 8" lower than the floor in the kitchen and we wondered how they raised it up to match. Well, I found out. After removing the ceramic tile, there was cement board. The cement board was very securely fastened (glued & screwed) to what looked to be plywood. I scraped, but I wasn't able to totally remove the adhesive from the plywood and since the new VCT requires an absolutely smooth surface (imperfections will show up on the finished floor) I was advised by a flooring guy to remove the plywood and put down a new sheet on the floorboards. No problem, right? Riiiight.


It would have been easy... if there were floorboards. There aren't. Nope, just 2x6 boards put together like mini floor joists without the tongue & groove floorboards. Actually, it was very solid, so I'll probably just replace it with smooth plywood, but it's kind of a pain because the door threshold is on top of it. As was the sheetrock.

There were also remnants of mice under there. Surprise! Actually it was extremely gross because there were drippings, nests, dead mice... the works. I'm very weary of dealing with mice remains and re-doing half-hearted attempts at rodent proofing the house. I'll spare you pictures this time, but let's just say I did a few more full body shutters. Really really gross.


Electrical. Hmmm.... yeah. I don't know why they didn't just run those three conduit lines over where the rest of the wiring accesses the crawlspace. Seems like it would have been easier than bashing two holes in the wall. Luckily for me those holes will be hidden inside a cabinet, but yeah, I have to figure out a way to mouse-proof this area. So I made a template from a Pepsi box and will cut out a piece from plywood and totally seal things off with plenty of that spray foam stuff. And maybe steel wool. And mice poison. And maybe a cat. sheesh!


Since I started this post, I've cleaned out all the icky stuff, sealed off the electrical stuff, put in new plywood "floorboards" and topped it off with 1 1/16" tongue & groove plywood subfloor. Everything is solid and it's going to have to be one very determined mouse to find a way into the house.

Monday, November 2, 2009

The Family Room (pt 1)

Much like how we were sort of compelled to re-do the laundry room at the same time as the small bathroom (click here to read up on that saga), the family room is attached to the kitchen, therefore it's gotta be spruced up at the same time.

Luckily, it's a simple, no-nonsense room and our plans are to merely re-do the floor in VCT to match/compliment the kitchen & office (right now it's carpet), add corresponding window trim & baseboards, paint the beams Oxford Brown and call it done. Simple, right? Yeah... that's what I thought.

Since we made the opening from the family room to the dining room wider, we had to replace the beam over that opening, which meant we had to expose the studs. So the sheetrock on that wall had to go.
("the toe-bone's connected to the foot-bone...")
Since the sheetrock’s gone and that’s the wall we’re going to hang a flat screen TV on, wouldn’t it be smart to fix up the connections so we won’t have a bunch of wires hanging down from the TV?
(“the foot-bone’s connected to the ankle-bone…”)
And while I’m not a movie freak or audiophile, it would be kinda cool to have speakers up in the corners and maybe on the back wall for surround sound.
(“the ankle-bone’s connected to the shin-bone…)
But the back wall still has sheetrock on it… should I fish wires up from the crawlspace through the wall, or just pull that sheetrock off so it’ll match the kitchen?
(“the shin-bone’s connected to the knee-bone…)

So now I have some questions:
How much $$ will that add to our new sheetrock bill?
Shouldn’t be TOO much, the remaining sheetrock is on walls that are mostly glass. Materials: not so much. Labor: probably most of the cost.

How do I wire this stuff?
Hmmm, we had a guy from The Geek Squad (Best Buy) come take a look and he said it was a really really simple job.
- Run some speaker wire where we want the speakers (left, center & right front; left & right rear, and subwoofer)
- Put in a “clock electrical outlet” up where the TV will be (didn’t see one of those at Lowe’s)
- Put up a “full-motion” TV mount
- Position the cable, electrical & phone outlets about 2 feet off the floor so they’ll be out of sight inside the as-yet-to-be-selected media cabinet
- Position the "to speakers" and “to TV” inlets next to the outlets
- Make accommodations for RCA plugs from the Wii and HDTV PS3 system and extras for like a video camera or an iPod/computer connection

Hmmm, doesn’t sound so simple to me, so I’ll be drawing up a “media wiring” diagram and maybe it’ll seem more doable.