Tuesday, December 18, 2007

Bathroom Hardware

I have a new resource for my restoration research: Retro Renovation! It boasts a great selection of ideas and resources for vintage appropriate home restoration... including bathroom hardware, colors, fixtures, and much, much more. We added it to the links section of the blog and I'll be referring to it often.

Franklin Brass has a nice line of hardware. These are the items that caught my eye... especially love the recessed soap dish and tissue holder.

Shopping List:

Recessed soap dish
Soap dish
Toothbrush holder
Tissue holder
Towel Shelf
Towel bar
Towel ring

Now I need to work on the cabinet design. We have a cabinet guy on deck just waiting for the green light, so I better get busy.

Fun-Due Friday!

We had our first party!... a small get together with The Verbtones and their families. It's still a construction zone, but if you photograph the right angles, you'd never know!

My friend, Marie, put together this video tour of the house. It makes me smile. Thought I'd share it!

Looking for a Genie...


Yes, I'm the biggest geek in the world. I like the I Dream of Jeannie bottle, though. -Steve


...all the magic is happening in the kitchen!

FINALLY there's a picture of Haley in the blog!! That's her in between the two Verbtone wives. Three Fondue Pots going at the same time... that's a new record for us! -Steve


Do you think we have enough food?

Our snappy Burke kitchen table set. Tulip base on the table, propeller bases on the chairs. That's a huge pile O bread, huh? -Steve


DD showing us all the proper way to eat fondue. What a cutie!!! -Steve


It's a Fondue Frenzy!!! -Steve


And some people think mid-century modern style is cold. I love this room and how warm and comfy it is. The house is perfect for parties! We love it!! -Steve


Fondue, Fun, and Entertainment!

DD providing some laughs for the whole gang! HAHAHA! -Steve

Monday, December 17, 2007

Formica Rocks!

Just received my countertop samples in the mail! I'd love to find white Formica with gold flecks, but I don't think they manufacture it anymore. I did find some fun patterns in the Formica "classic" collection. A couple are simple enough to fit our bathroom design.
VirrVarr White
VirrVarr Lite Blue

The VirrVarr White sample is a matte finish, but the site says it comes in polished. I'd prefer polished... so we'll double check to see if it's available.

New design comp with countertop material:


1. Toilet/Sink: Kohler Tea Green
2. Tile (tub surround and backsplash): ModWall Lush Kahuna (glass blend)
3. Floor: ECOsurfaces GI Joe
4. Counter: Formica VirrVarr White
5. Walls: Aqua/Blue... light turquoise (TBD)

I thought I would weigh in here... I really like this whole thing. At first I wanted vintage fixtures from a building recycling center, but after seeing these color choices I think this is a smart way to go. Also using new stuff should keep my adventures in amateur plumbing and pipe repair to a minimum! I especially like the floor! -Steve

More Bathroom Resources

Today I'm working on floor and tile options. The gutted bathroom project is haunting me, and we need to start ordering... takes up to 4 weeks to get the toilet and lavatory, so design decisions must be made quickly. We have an idea of the colors we want to go with, but the combinations of flooring, tiles, formica, fixtures, etc. are still a little fuzzy. I'm narrowing down the choices, and here's the short list:

Floors:


Marmoleum


Rubber Flooring
Recycled Rubber Flooring - ECOsurfaces

ECOsurfaces Commercial Flooring, made from recycled rubber, combines outstanding slip resistance with cushioned resilience and easy maintenance. Perfect for a wide variety of installations this resilient reincarnation of retired tires is what's new in green design. It's available in rolls or tiles, and in 54 standard colors, with 29 custom granules for those who want a color blend all their own.


Tiles:

The tub surround and back splash behind the sink will need some tile. We like the 1 x 1 mosaic tiles. Found some glass tile that looks really slick, but also like the traditional ceramic. Here is some 1 x 1 glass/ceramic tiles blends that are at the top of the list.


Check these out! They are so cute. Don't know if we'll use them in the bathroom, but thought they were interesting.

ModDotz Blend "Miami"
— This porcelain has a very low moisture absorption rate and is great for indoor and outdoor use including wet areas... so they're a great option for floors/walls in bathrooms and kitchens.

Sample decks are ordered and I should have them by the end of the week. I need to see how each color and design will all work together in the space. Should have the final design choices complete by the end of the week. Then we SHOP!


Here's my first attempt. Like the color combo on screen, but need to see the actual samples before making the final decision.

Thursday, December 13, 2007

Holiday Decorating!

Not many decorations survived the move. We put up the aluminum tree and decorated it with some vintage balls—turquoise! That's about it.


About 9am every day when the sun's out (which isn't very often.... this is Oregon, y'know) the sun shines through the clerestory window directly on the tree. Notice the other-worldly glow! No additional lights were used in taking this picture. At night, we flick on the color wheel. -Steve


Our neighbor was selling this gorgeous vintage aluminum tree... so naturally we took it and put it up in the family room. It's too big for the room, but beautiful. I bought some lime green balls for it, but think I'll be looking for something else (after Christmas sales!)


Steve weathered the storm a couple of weeks ago and put up the lights on the outside of the house. We used multi-colored lights (the large ones) and outlined the roof line. It looks great. A cheesy metallic wreath next to the garage completes the look. Not much, but at least it will be easy to put away this year! (I'll take a picture tonight and post it later.)

Did you know...

Kohler makes bathroom fixtures in several colors! We have been researching for the bathroom re-do. Here are my favorites:

Blue—


Blush—


Tea Green—


The boy likes the blue... the girl likes the blush... so we'll probably settle on the tea green. I have tile samples on order, so no final decision will be made until we select floor, tile, and formica.

Notice the metal frame on the sink! Didn't know they made those anymore. Yay!

When Haley first emailed me the green sink pic, she commented on the "metal band." Of course I responded with a remark about Winger, Ratt and Motley Cru.
Aren't we h-i-larious?!! -Steve


Came across this vintage ad for bathroom color combinations. (Thanks to www.retrorenovation.com)


One more thing! You can custom order a new toilet seat to match the color of your vintage toilet. Looks interesting, but we already recycled our old toilet.

Friday, November 9, 2007

Big "Sigh..."

Okay, so my "no construction" rule was short lived. As Steve mentioned in the last post the 2nd bath has jumped to the top of the to-do list. I wish I could say it was a terrible and tragic accident or act of nature that caused the damage (then it would be covered under our home warranty insurance OR our home owners insurance.) But no, the second bath was diagnosed and confirmed to be suffering from an "improperly installed toilet." And suffering for years!

It was just last Friday that Steve (in horror) pulled me into the kids' bathroom to view his discovery. We stood there staring at the toilet. Fun. Then he flushed and pointed to the tile floor. I watched. Gross. Waste water oozed from the base of the toilet about 6 inches, sat on the tiles for a few seconds, then soaked through the grout to the subfloor. We turned the water off, put the tank lid on the seat, and taped a big sign on the seat, "TOILET IS BROKEN! USE MOM AND DAD'S BATHROOM."


Oh it's soooooo tempting to just lift it up, put on another wax ring, seal it up and pretend there isn't a half inch of soggy particleboard underneath. Mold schmold. All together now.... "sigh."
-Steve


I called the plumber first thing Saturday morning.

Monday morning at 8am the plumber stopped over to check out the problem. He pulled the toilet... yep, it was wet under there. YUCK.

Apparently, when the previously owner had the tile floor installed they did not increase the depth of the toilet flange to compensate for the increased thickness of the floor. So when the toilet was reinstalled, the toilet and toilet ring never properly sealed. (I have never typed toilet so many times in one sentence.)

The plumber checked under the house to see what we were dealing with as far as existing pipes. Not cast iron, so that's a plus.
-Steve


Bottom line:

we have a problem that needs to be fixed now.

Max and I contemplating the jobs that lie ahead of us.
-Steve


Steve and Max tackle the demo in manly style.

1. Pull the toilet and move to side yard. Max brought in a skateboard to place under it and they pushed it through the house. They were quite the pair of grand marshals enjoying the toilet parade. Good thing we have a 9 year old boy to keep the mood light!

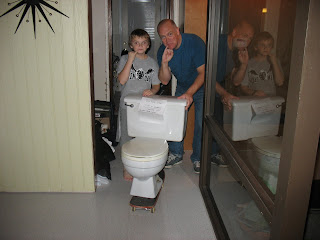
Now we have a toilet on the side of the house.... classy! I'll be taking it to The Rebuilding Center soon. But I'm keeping the skateboard!
-Steve


2. Remove the sink and vanity.
When I say we bought a "fixer" I really mean it. The first drawer we pulled out fell apart in our hands. Nice. The vanity proved to be too large to fit through the door. (How did they get it in there?... It is not original.) So the boys took hammers to it and ripped it apart.

That was fun. Demo! Anyone want a genuine fake-gold fancy schmancy faucet?
-Steve


Ahh yes.. the craftmanship of thin particleboard and staples. This stuff just kills me.
-Steve


3. Assess floor damage.
With the toilet and vanity removed we could see how far the water damage had gone. The subfloor under the vanity area was wet.


Note the mice droppings. nice.
-Steve


With the bathroom gutted we are now down to ONE usable bathroom. This is a first for us, but we'll survive. At least until we have the 15 family members over for Thanksgiving! Now that will be interesting.


NEXT STEPS:


1. Remove tile and subfloor
2. Assess the floor decking and let it dry out, assess again
3. Tear out and replace sheetrock/wonderboard
4. Lay new subfloor (possibly patch the damaged decking)
5. Tile tub surround
6. Resurface tub
7. Install new floor (material TBD)
8. Paint walls
9. Install new toilet and vanity (style and color TBD)
10. Hang guest towels!

Did I mention the the bathroom is connected to the laundry room? It's getting a makeover by default.

Installing a new toilet won't be very tricky (as soon as we find a toilet and sink in the shade of green we want), it's the other stuff I'm dreading...
  • repair the damage to the floor
  • put in a new floor (VCT? Marmoleum? New tiles? ??)
  • install new sink
  • design & build new cabinets
  • re-finish the original tub so it matches the toilet & sink
  • new tiles
  • since there's old wallpaper under the paint, maybe we should just put in new sheetrock... and insulation
  • new light fixture
  • maybe install an exhaust fan in the wall
  • paint

And since the bathroom is connected to the laundry room, they should have the same floor, so let's re-do that room, too.

  • New floor (hopefully no damage under that one... !!)
  • stack the washer and dryer
  • new floor to ceiling cabinets
  • birch panelling on one wall
  • new light fixture
  • paint

Oh and the bathroom door is kinda skinny. We should take the door we just put in that bathroom, widen the opening and put in another new door. Then take that skinny door and use it for the pantry.... and so it goes......
-Steve

Sunday, November 4, 2007

MCM Holidays Begin!


Halloween is done and with it we usher in our first holiday season in the Rummer! I'm in decorating mode (construction will need to wait.) Our decoration inventory was drastically reduced in the move, the only things that survived are our shag-inspired skull and kitty cat for Halloween; and the aluminum Christmas tree (with color wheel and rotating/musical tree stand.)

The kids converted the ball light in the entry into a glowing jack-o-lantern. That was fun. And we'll most likely do that again next year.


I'm at a loss for Thanksgiving so I might just launch right into Christmas. Last summer I scored a huge tub of vintage tree decorations at a local garage sale... all in TURQUOISE! Love it. Is it too soon to put up the shiny tree?


(No, I haven't put up the tree yet! This is a photo from last year.)

Yes, it's too early to put up the tree and construction will have to wait a bit... or will it?!!!

Stay tuned for a horrifying tale of a simple toilet, improperly installed by the previous owner. Cringe at the consequences of not using cementboard under a bathroom tile floor and endure the eerie, creeping sensation of wet, rotting particleboard. Has the tongue & groove decking escaped the horrors of sewage-water moisture rot? There's only one way to tell, and with the aid of a hammer and crowbar we will be tearing into the floor in the kids bathroom soon... very soon...

Regardless of what evils lurk beneath the 12x12 ceramic tiles, this story is guaranteed to scare the C, R, A, you-know-what out of you! (...well, at least I know it scares me!!!)
Happy holidays, indeed.
-Steve

Monday, October 22, 2007

The BIG Blue Door...

It's time to replace the existing front door... for several fundamental reasons.

First, it is a double French door that only opens on one side. The opening is a not so generous 30 inches. Not big enough for the huge front entry.

Second, the glass doors do not allow for much privacy. I removed the old blinds some time back and threw them away. Didn't stop to think that without them you get a clear view of the whole house and with all the glass you can see straight into the back yard. Absolutely NO privacy. It is quite the event to get from one side of the house to the other in my robe without putting on a show for the neighbors. Plus, it really limits the "nobody's home" game when the door bell rings!

Although, you gotta admit it's kinda fun to crank Lalo Shifrin and creep from post to post secret agent style. It is MUCH better to be able to fit things wider than a large pizza through the door. -Steve


NOTE: The cat on the chaise. That's Cooper and he seldom moves. -Steve


The new door.


We pulled off the interior sheet rock above the door and found the original rough opening. With those measurements we went to Crown Door and ordered a new solid core flush birch door with sidelight. The new door measures 42 inches wide by 7 feet with a 20 inch side light.

This is DD and me artistically painting the door and frame. She did a GREAT job!
NOTE: Cooper's still on the chaise.


It arrived unpainted. With one coat of oil based exterior grade primer and 2 coats of exterior semi-gloss latex we were in business. Our contractor, Randy, stopped over after work to help Steve install the door... or did Steve help Randy? Not sure, but they are a good team.

Oh, I'm totally the not-so-helpful, but he's trying so hard assistant. I just did what he told me to do, including stand outside for what I'm sure was way too long checking the alignment of the gaps... I think he was just tired of me asking dumb questions! -Steve
Like the TV? It's a Muntz and has a build in AM radio, and record player. Only the radio works all the time, the rest sparatically. I'm considering either gutting it and replacing the innards with a functioning stereo system and flat screen TV or consulting our 1961 Mechanix Illustraited Encyclopedia and trying to fix it myself. ....yeah. Like I need another thing to fix. sheesh.


After a couple of tries and lots of shims the door was in. I guess the concrete floor in the atrium is not quite level (I swear that atrium floor is going to haunt me forever!)

We had the holes for the lock set and knob drilled for a 5 inch back set rather than the typical 3 inch. This gives the knob a little room and looks much better on a door this size. My fantasy door knob is centered... but they do not manufacture those any more and it's nearly impossible to find new old stock for a reasonable price.


Putting in the door knob and lock set seemed to be a little more tricky than expected, but finally it worked and the door was in.

Now that's a front door!

Come in, won't you? Please excuse the cat on the chaise! -Steve


Next steps for entry:
1. Caulk, paint and touch up
2. Install new door bell button and switch cover
3. Find, buy and install front door camera... no peep holes for this door!
4. Pressure wash and seal aggregate
5. Install new house numbers
6. Install new front light fixture
7. Find a bench for the entry