Saturday, April 28, 2007

Hen-pecked peckerwood...

Steve's been singing this Dave & Deke Combo song all day... He mostly mumbles under his breath, but every so often I catch the line: "...but she had other think'in, she wanted me to panel the house!"

OK, it's true. I never thought we would want to put paneling on the walls, but now that it's starting to go up... I love it.

We purchased 10 sheets of 4' x 8' St. Helen's birch paneling (from Mr. Plywood) and hauled it over to the house in the back of the truck. It stuck out a little, but Steve strapped it down and then followed behind me in the GTI to keep a close watch on it.

Got it home safely and set it up in the living room to match color and grain on the panels.


Today we started installing it in the hallway (you can see it from the atrium through the glass wall!) Aside from a small glue spill on the newly waxed (and buffed) VCT, it went up pretty smoothly. Can't wait to get the rest up.

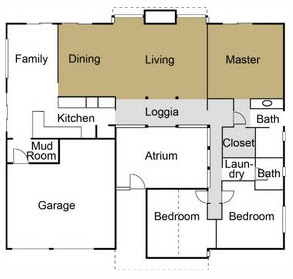
After we finish the hallway, we will panel the dining room. It a nice accent to all the trim and windows in the main living area of the house. I'll post more pictures when it is complete.


NOTE FROM STEVE:
Here's a link to the song Haley's talking about: "Henpecked Peckerwood" -- Dave & Deke Combo; Hollywood Barn Dance CD, track #12. ...is for fun.
http://www.amazon.com/Hollywood-Barn-Dance-Dave-Combo/dp/B000000I58/ref=pd_bbs_sr_1/103-6286616-2162260?ie=UTF8&s=music&qid=1177951402&sr=8-1

The paneling is going up well. If you ever want to know how un-square your house is... install paneling. And what's the glue for anyways?!! You gotta nail in all across the top, down the sides and at the bottom to hold it up against the wall so the glue can set, but if the nails are holding it up, why bother with glue?!! All it does is stink up the house, drop a glob or two on our newly polished VCT floor and give me a headache... sheesh...

I can't wait to put up the trim, there's about 1/4-inch of wiggle room at the top, bottom and corners which will be covered with simple crown and corner moulding and baseboards. Right now it just looks like the pieces aren't cut right.
-Steve

Let's swim!


We were able to drain most of the water in the pool with the small electric pump we found in the shed. However... the last few inches, leaves and all, will need to be taken out by hand. We will hook up the wet/dry vac tomorrow to suck up the rest of the water. But what about the leaves? Aha! That why we had kids! (Well, not really, but they were willing to jump in the pool and scoop out the leaves.)

DD started getting a little grossed out, but Max just went to town with the net. We finally came up with a good division of labor:
Max tossed the leaves up on the side of the pool deck,
DD swept up and threw the leaves into the debris pile.
Worked great... and I didn't even get wet. I love supervising.

Sunday, April 22, 2007

Cork floors are done!

They are beautiful!

We applied two layers of water based varathane to the cork planks and the result was amazing. Just need to stay off of them for three days.


Two things I learned:

1. Read the label! Make sure that both cans are the same finish... I'm a designer. I don't read labels. They looked the same to me. (See the small print at the top: "semi-gloss" and "satin") Luckily, we discovered the error, and Lowe's was open late!


2. Wear a hair net.
(Random strands of hair and varathane don't mix well.)

The ball is in!


And we are basking in it's glow.

Installed one of the ball lights from Marci and Austin (Sputnik Housewares) and couldn't love it more. It greets visitors as they approach the entry, and the reflection in the celestory window is an added bonus.

I'm now seriously considering running power to the peak in the living room and installing the other ball light!

Who needs a glass atrium?...

when plastic works just fine!

1. Plastic is clear (like glass)
2. Plastic is easy to install (like glass)
3. Plastic is only $2.99 (NOT like glass)


Seriously, we cleaned out the atrium and taped up plastic in preparation for the concrete guy. (Hope he shows up this week!) It's a really messy job and we are hoping the plastic will confine most of the concrete dust.

We have really been at a loss with the atrium floor. Do we stain it? Acid wash? Custom coating? We really want cement aggregate, but decided to just grind off the top layer of the concrete floor to expose the rocks. It will kind of look like aggregate without the texture... the concrete guy assures us that once it is ground, sanded smooth, and sealed it will look close to terrazzo. Love that... so my hopes are high.

Check out our cement pond!

Jethro, it's time to clean the pool.


We have been centering all of our attention on the interior since the day we got the keys. Yesterday afternoon our attentions turned outside! We had a couple of visitors floating in the pool. They seemed pretty content, but didn't stay long. I'm sure the salamander we inherited with the pool didn't like the intrusion!

Today, Steve found the pool pump in the shed and hooked it up. The pump works great, and we just put the hose over the fence to drain. It sucked out about 1 inch/hour... so it will take a few days to empty the pool. (Hopefully that will give us enough time to finish some interior projects in the works.)


Friday, April 20, 2007

Cork flooring goes in!

We started installing the cork flooring the other night. After a few hours of intense installation, we had TWO rows in! To save time and keep our marriage intact, we called John (floor installer). The master bedroom, hall, and closet are nearly done and we hope to have the rest finished and 2 coats of water-based polyurethane brushed on this weekend. (fingers crossed!)


BTW: Click planks are just that... planks! In certain light you can see the plank lines. Don't know why I thought is would be a solid surface. Still, it looks fantastic! And the color is great. Steve says it feels great under bare feet, but I haven't tried it yet.

LESSON #34: Brown is NOT brown...

Some brown is GREEN... and not a good green. What?

That's not what we want!

I found a piece of old trim with the original brown paint on it and took it to Rhodda for a match. It actually is a perfect match to an OLD color they had...

CP103 Oxford Brown

They still can mix it up, but they don't have any sample chips of that color in their display. It's OLD, so you must ask for it!


Now, we're painting with the right brown. One more lesson learned.

When one door closes... another opens!

Rumor had it that the original floorplan of our Rummer had a door between the dining room and family room. Our dining room wall was covered in diagonal tongue and groove cedar planks and must have been installed sometime in the mid 80s. The only way to find out if a doorway once existed was to remove the planks... yes, more demo!


Our daughter, tore into the diagonal planks over spring break and uncovered the original door opening. My first "design" idea was to move the door closer to the kitchen wall (only 10 inches), but after electrical and construction costs nixed that idea we decided the door worked just fine in its original location... I mean, in keeping with the original architectural intent and design integrity, we chose to keep the door where it was.

Demo continues:


First, the sheet rock had to be removed. It's very therapeutic to slam a hammer into a wall. With sheet rock removed we could see the outline of the door frame and the overhead beam. (Steve had an interesting incident with the beam... and construction adhesive! This of which we do not speak of!) ;-)

Next, we had the electrical re-routed. We temporarily lost power to the dining room light, but did a quick fix until we can get the electrician back in.


With the electrical moved, Steve removed the 2 x 4 framing and sheet rock on the family room side of the wall. Since we are not touching the family room right now, it was important that we didn't go too nuts with the demo on this part of the project.


Finally the door is OPEN! The flow between the two parts of the house now make sense. I love it. We will finish off the wall edges when we put up the new paneling in the dining room, then paint the overhead beam the same brown as the rest of the beams in the house. Should look great... and so much more functional! We can now walk from the kitchen to the dining room.

Wednesday, April 18, 2007

Flooring, Wiring, and Painting... oh my!

The progress continues...

Flooring Update:
The VCT tile is in. We had it installed in the loggia and hallway, framing the two window sides of the atrium. After much debate between VCT and terrazzo tiles, we finally selected Arteffects Silvervpoint, a 12" x12" vinyl composite tile from Armstrong. It's white with black specs.


How can you pass up this... Armstrong's description:
"Exquisite in its virtually seamless beauty and textural dimension, this premium tile elevates floor design to an art form."

I don't know about "art form", but the installation was quick and the result is beautiful... and inexpensive! This really saved our budget. The butt joints of the VCT were then sprinkled with a white powder and swept to fill in any visable joint lines. Now I have a janitory service scheduled to come in next week to wax, buff, and seal. Once sealed we should only have to damp mop regularly and buff it once a year to maintain the luster. PLUS, it has an amazingly long product life... 20 or 40 years? Can't remember exactly, but long enough for us to not worry too much about replacing it any time soon.


The cork flooring is well acclimated now, and we will start installing it in the master bedroom tonight. We'll see how it goes. If we are successfuly, we'll then move to the living room and dining room... if not, we'll be calling John (the tile installer) to help us!

Wiring Update: Opening the wall between the dining room and family room was a little move problematic than we expected. We removed the sheet rock and could see where the original opening was. BUT... I wanted it move 10"! It could be done, but electrical running through that part of the wall would be a 2 day job vs. a 2 hour job. At $85/hour... we are keeping the door in it's original place! So the wall is now ready to be opened, but somewhere during the wire removal we lost power to the dining room light. That's the next thing: rewire power to dining room light!

All the conduit in the atrium is removed. We will use the original power outlet on the garage wall and then use solar lights in the rest of the atrium. Should work just fine.

The outside light in the enterance was removed and the peek has been wired for... you guessed it, one of the HUGE ball lights. (I spray painted the fixtures black today... so hopefully we can install it tonight.) The electrician tapped into the wiring through the garage and pulled it up through the ceiling. The rest runs through conduit up and across the beam. We will paint that the same color as the beam and it shouldn't be too noticable. Can't wait to bask in the welcoming glow of the ball light in the entry way.

Painting Update:
One coat of primer and two coats of the brown paint are up in the atrium, but the final color tends toward the green side of brown. It needs to be more red... so the third coat will be a different paint color. We've selected it, but don't have a name or paint number for it yet. I'll post it when we finally get it mixed.

Steve filled in some the of the damaged posts with bondo:


This week's punch list:

1. Install cork flooring in master bedroom, living room, and dining room
2. Open door between dining room and family room
3. Measure for new doors
4. Measure and order molding
5. Measure and purchase Luan paneling
6. Stain paneling and prep walls for installation
7. Grind and seal concrete floor in atrium
8. Install ball light in the entry
9. Shop for new light fixtures for atrium and master bedroom
10. Finish painting the atrium and beams (living room and dining room before floor install)

Good grief! You'd think the list would be getting shorter... it's going to be difficult, especially since Steve spent the first part of the week in Seattle on business... and what? No IKEA side trip. I'll have to go with him next time!

Wednesday, April 11, 2007

Two Rooms: Done!


We let each kid pick the carpet and paint color... and they painted their own room (with a little supervision from Mom and Dad.)

Max picked an electric, steel blue for his walls and a "jungle" green closet. The loft is all ceiling and windows, so thank goodness we didn't have to climb up there with our paint buckets and brushes!

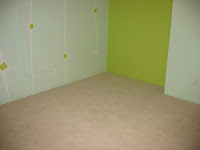
Delaney selected 3 colors (lime, aqua, and cream) for her room and designed the accent wall pattern. The closet and nook for the murphey bed was painted "dinosaur" green and the remaining walls are a light aqua. Delaney taped up the accent wall design and painted the small squares green, then went over the rest of the wall with the aqua. When we removed the tape the cream lines outlined her design. It turned out great.

Tuesday the carpet went in. These are the only rooms getting new carpet, so we chose a really good 1/2" pad for comfort. The kids will spend a lot of time in their rooms on the floor, so it was important to put a little extra into the carpet and pad.

Both rooms have a creamy, beige color but look and feel completely different. Delaney's room has a longer shaggy look and feel, and Max's is a plush, low cut pile. They are perfect and the kid's did a great job in selecting the right carpet for them.

Two rooms are completely DONE! Too many more to go, but at least the kids will be at home!
Wellllll..... not completely done. I still need to install baseboards, closet doors, window & door trim . They need new doors, too. -Steve

The Atrium is Perfect


...for a heated and highly competitive game of four square!

All work and no play make us all too dull... and grumpy. So it was fun to goof around a bit with the kids on Easter. (You can tell it's still a construction zone with all the dust flying in the air.)

It did get a little nasty. We didn't let the kids win... they kicked our sorry butts all on their own.

REALLY! I feel so old. -H