Thursday, December 13, 2007

Did you know...

Kohler makes bathroom fixtures in several colors! We have been researching for the bathroom re-do. Here are my favorites:

Blue—


Blush—


Tea Green—


The boy likes the blue... the girl likes the blush... so we'll probably settle on the tea green. I have tile samples on order, so no final decision will be made until we select floor, tile, and formica.

Notice the metal frame on the sink! Didn't know they made those anymore. Yay!

When Haley first emailed me the green sink pic, she commented on the "metal band." Of course I responded with a remark about Winger, Ratt and Motley Cru.
Aren't we h-i-larious?!! -Steve


Came across this vintage ad for bathroom color combinations. (Thanks to www.retrorenovation.com)


One more thing! You can custom order a new toilet seat to match the color of your vintage toilet. Looks interesting, but we already recycled our old toilet.

Friday, November 9, 2007

Big "Sigh..."

Okay, so my "no construction" rule was short lived. As Steve mentioned in the last post the 2nd bath has jumped to the top of the to-do list. I wish I could say it was a terrible and tragic accident or act of nature that caused the damage (then it would be covered under our home warranty insurance OR our home owners insurance.) But no, the second bath was diagnosed and confirmed to be suffering from an "improperly installed toilet." And suffering for years!

It was just last Friday that Steve (in horror) pulled me into the kids' bathroom to view his discovery. We stood there staring at the toilet. Fun. Then he flushed and pointed to the tile floor. I watched. Gross. Waste water oozed from the base of the toilet about 6 inches, sat on the tiles for a few seconds, then soaked through the grout to the subfloor. We turned the water off, put the tank lid on the seat, and taped a big sign on the seat, "TOILET IS BROKEN! USE MOM AND DAD'S BATHROOM."


Oh it's soooooo tempting to just lift it up, put on another wax ring, seal it up and pretend there isn't a half inch of soggy particleboard underneath. Mold schmold. All together now.... "sigh."
-Steve


I called the plumber first thing Saturday morning.

Monday morning at 8am the plumber stopped over to check out the problem. He pulled the toilet... yep, it was wet under there. YUCK.

Apparently, when the previously owner had the tile floor installed they did not increase the depth of the toilet flange to compensate for the increased thickness of the floor. So when the toilet was reinstalled, the toilet and toilet ring never properly sealed. (I have never typed toilet so many times in one sentence.)

The plumber checked under the house to see what we were dealing with as far as existing pipes. Not cast iron, so that's a plus.
-Steve


Bottom line:

we have a problem that needs to be fixed now.

Max and I contemplating the jobs that lie ahead of us.
-Steve


Steve and Max tackle the demo in manly style.

1. Pull the toilet and move to side yard. Max brought in a skateboard to place under it and they pushed it through the house. They were quite the pair of grand marshals enjoying the toilet parade. Good thing we have a 9 year old boy to keep the mood light!
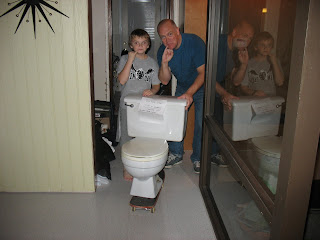
Now we have a toilet on the side of the house.... classy! I'll be taking it to The Rebuilding Center soon. But I'm keeping the skateboard!
-Steve


2. Remove the sink and vanity.
When I say we bought a "fixer" I really mean it. The first drawer we pulled out fell apart in our hands. Nice. The vanity proved to be too large to fit through the door. (How did they get it in there?... It is not original.) So the boys took hammers to it and ripped it apart.

That was fun. Demo! Anyone want a genuine fake-gold fancy schmancy faucet?
-Steve


Ahh yes.. the craftmanship of thin particleboard and staples. This stuff just kills me.
-Steve


3. Assess floor damage.
With the toilet and vanity removed we could see how far the water damage had gone. The subfloor under the vanity area was wet.


Note the mice droppings. nice.
-Steve


With the bathroom gutted we are now down to ONE usable bathroom. This is a first for us, but we'll survive. At least until we have the 15 family members over for Thanksgiving! Now that will be interesting.


NEXT STEPS:


1. Remove tile and subfloor
2. Assess the floor decking and let it dry out, assess again
3. Tear out and replace sheetrock/wonderboard
4. Lay new subfloor (possibly patch the damaged decking)
5. Tile tub surround
6. Resurface tub
7. Install new floor (material TBD)
8. Paint walls
9. Install new toilet and vanity (style and color TBD)
10. Hang guest towels!

Did I mention the the bathroom is connected to the laundry room? It's getting a makeover by default.

Installing a new toilet won't be very tricky (as soon as we find a toilet and sink in the shade of green we want), it's the other stuff I'm dreading...
  • repair the damage to the floor
  • put in a new floor (VCT? Marmoleum? New tiles? ??)
  • install new sink
  • design & build new cabinets
  • re-finish the original tub so it matches the toilet & sink
  • new tiles
  • since there's old wallpaper under the paint, maybe we should just put in new sheetrock... and insulation
  • new light fixture
  • maybe install an exhaust fan in the wall
  • paint

And since the bathroom is connected to the laundry room, they should have the same floor, so let's re-do that room, too.

  • New floor (hopefully no damage under that one... !!)
  • stack the washer and dryer
  • new floor to ceiling cabinets
  • birch panelling on one wall
  • new light fixture
  • paint

Oh and the bathroom door is kinda skinny. We should take the door we just put in that bathroom, widen the opening and put in another new door. Then take that skinny door and use it for the pantry.... and so it goes......
-Steve

Sunday, November 4, 2007

MCM Holidays Begin!


Halloween is done and with it we usher in our first holiday season in the Rummer! I'm in decorating mode (construction will need to wait.) Our decoration inventory was drastically reduced in the move, the only things that survived are our shag-inspired skull and kitty cat for Halloween; and the aluminum Christmas tree (with color wheel and rotating/musical tree stand.)

The kids converted the ball light in the entry into a glowing jack-o-lantern. That was fun. And we'll most likely do that again next year.


I'm at a loss for Thanksgiving so I might just launch right into Christmas. Last summer I scored a huge tub of vintage tree decorations at a local garage sale... all in TURQUOISE! Love it. Is it too soon to put up the shiny tree?


(No, I haven't put up the tree yet! This is a photo from last year.)

Yes, it's too early to put up the tree and construction will have to wait a bit... or will it?!!!

Stay tuned for a horrifying tale of a simple toilet, improperly installed by the previous owner. Cringe at the consequences of not using cementboard under a bathroom tile floor and endure the eerie, creeping sensation of wet, rotting particleboard. Has the tongue & groove decking escaped the horrors of sewage-water moisture rot? There's only one way to tell, and with the aid of a hammer and crowbar we will be tearing into the floor in the kids bathroom soon... very soon...

Regardless of what evils lurk beneath the 12x12 ceramic tiles, this story is guaranteed to scare the C, R, A, you-know-what out of you! (...well, at least I know it scares me!!!)
Happy holidays, indeed.
-Steve

Monday, October 22, 2007

The BIG Blue Door...

It's time to replace the existing front door... for several fundamental reasons.

First, it is a double French door that only opens on one side. The opening is a not so generous 30 inches. Not big enough for the huge front entry.

Second, the glass doors do not allow for much privacy. I removed the old blinds some time back and threw them away. Didn't stop to think that without them you get a clear view of the whole house and with all the glass you can see straight into the back yard. Absolutely NO privacy. It is quite the event to get from one side of the house to the other in my robe without putting on a show for the neighbors. Plus, it really limits the "nobody's home" game when the door bell rings!

Although, you gotta admit it's kinda fun to crank Lalo Shifrin and creep from post to post secret agent style. It is MUCH better to be able to fit things wider than a large pizza through the door. -Steve


NOTE: The cat on the chaise. That's Cooper and he seldom moves. -Steve


The new door.


We pulled off the interior sheet rock above the door and found the original rough opening. With those measurements we went to Crown Door and ordered a new solid core flush birch door with sidelight. The new door measures 42 inches wide by 7 feet with a 20 inch side light.

This is DD and me artistically painting the door and frame. She did a GREAT job!
NOTE: Cooper's still on the chaise.


It arrived unpainted. With one coat of oil based exterior grade primer and 2 coats of exterior semi-gloss latex we were in business. Our contractor, Randy, stopped over after work to help Steve install the door... or did Steve help Randy? Not sure, but they are a good team.

Oh, I'm totally the not-so-helpful, but he's trying so hard assistant. I just did what he told me to do, including stand outside for what I'm sure was way too long checking the alignment of the gaps... I think he was just tired of me asking dumb questions! -Steve
Like the TV? It's a Muntz and has a build in AM radio, and record player. Only the radio works all the time, the rest sparatically. I'm considering either gutting it and replacing the innards with a functioning stereo system and flat screen TV or consulting our 1961 Mechanix Illustraited Encyclopedia and trying to fix it myself. ....yeah. Like I need another thing to fix. sheesh.


After a couple of tries and lots of shims the door was in. I guess the concrete floor in the atrium is not quite level (I swear that atrium floor is going to haunt me forever!)

We had the holes for the lock set and knob drilled for a 5 inch back set rather than the typical 3 inch. This gives the knob a little room and looks much better on a door this size. My fantasy door knob is centered... but they do not manufacture those any more and it's nearly impossible to find new old stock for a reasonable price.


Putting in the door knob and lock set seemed to be a little more tricky than expected, but finally it worked and the door was in.

Now that's a front door!

Come in, won't you? Please excuse the cat on the chaise! -Steve


Next steps for entry:
1. Caulk, paint and touch up
2. Install new door bell button and switch cover
3. Find, buy and install front door camera... no peep holes for this door!
4. Pressure wash and seal aggregate
5. Install new house numbers
6. Install new front light fixture
7. Find a bench for the entry

Tuesday, August 14, 2007

More Ball Lights!

The original lights in most of the house were ball lights. Over the years they were "updated" and the original lights met with a fate I hate to discuss.

The dome light... not right!


We've been searching for replacements and decided to purchase three 10" ball lights from IKEA.

Not perfect... but Steve had ideas to make them work. I sense another craft project!

After trimming, painting, and replacing the mounting plate the finished lights look fantastic.
The main problem with the IKEA FADO lights are their bases... they're shaped like deep, handle-less teacups. I went to a hardware salvage place in Portland and bought three suitable, low profile bases, cut 2" off the IKEA tubes, painted everything gloss black and put it all back together. I think they turned out pretty darn good for a guy who's totally afraid of electricity. -Steve


Sunday, August 12, 2007

Building the Beds

The atrium needs plants! When the previous owners poured the new concrete floor, they filled in the flower beds. The only solution is to create raised beds... but with what? The typical materials just don't look right. We want something very simple and preferably stone or concrete. The garden supply centers turned up nothing that worked, but in the cement aisle of Lowe's we found simple 4" x 8" x 16" concrete blocks. Perfect!

Well.... perfect would have been the original atrium configuration of a few beds, exposed aggrigate concerete and a ultra-swanky water feature in the form of a small koi pond being fed water via a cement volcano!!! (I know... a VOLCANO!!!) That would have been amazing, but Haley says volcanos belong outside, so Krakatoa-east-of-Gresham will have to wait. Meanwhile in realityville, the concrete blocks look good, are super heavy and I think they'll take the sealer very well. -Steve

We "dry fit" the bed design and plan to live with it for a bit before we make it final... but so far I think it will work. And the step really makes a nice transition into the loggia.


Next steps:

1. Secure and seal concrete blocks
2. Select plants
3. Install drip watering system
4. Hook up Tiki water feature
5. Fill beds with river rock
6. Install lighting

Monday, July 2, 2007

Atrium Floor... 3rd Time's the Charm

The atrium floor has really been bugging me. After 2 attempts to get the look we wanted, I get the crazy idea to try again.

Found a concrete grinder with diamond bit inserts at Sunbelt rentals. Picked it up on a Friday and returned it on Monday... total cost $134.00. (Why didn't we do this the first time?)


Steve worked all weekend to grind off the concrete stain we applied and the 1/16th inch of concrete to expose the aggregate. This was a long and frustrating process.
Yes it was frustrating.... and not because the concrete was so tricky to grind down. It was frustrating because I couldn't figure out how to make the three grinding blocks stay put on the machines rotating wheel. They're held in place with small hardwood wedges and I wasn't hammering them into place good enough. A block, wedge and/or two blocks would go flying across the room without warning. ACK! Sometimes after 10 minutes of grinding, sometimes after 10 seconds of grinding. That and the ShopVac filter would clog up every 1/2 hour or so... but over all it wasn't awfully tricky, just my ineptness made it take longer than it should have. -Steve


The grinder did a great job, but left quite a bit around the edges and the finish wasn't as smooth as we had hoped for. So back to Sunbelt for more equipment! They located a hand grinder that would get right up to the edge of the wall, plus the diamond bit was a little finer so it could smooth out the swirls. (Approx. $50)


Sorry Steve... one more night of conrete dust in your hair, eyes, nose... but it was worth it. With a final coat of concrete sealer we finally have the floor we wanted.
I'm still finding concrete dust in places I didn't know were places!!! ACK!
-Steve