Thursday, December 17, 2009

Cabinets go in!

It's been a looong time coming, but the new kitchen is really starting to take shape. When we first walked through the house a little less than three years ago, we could see the potential of the other living spaces, but the kitchen was crying out for help. It had been remodeled back in the 80s with oiled oak cabinets and Italian tile. Good quality stuff, but not the style we felt was appropriate to the design of the house or to our tastes.
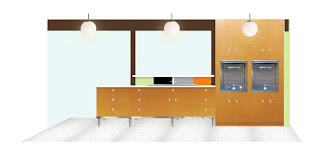

We gave our drawings and a pic of the Case Study #22 kitchen to our cabinet guy, wrote him a check and hoped he would do a good job. Haley was having nightmares of Swiss Chalet, rustic cabinets with wood burned accents.
This was to be our first peek at what he came up with. Was it close? Did he really "get" what we wanted? Would the release of nervous endorphins be too much for our systems? Would I have to take Haley to Urgent Care because she was so excited she was visibly vibrating. Now was the time to find out!

The first piece in place... hmmmm... I think I like it, I like the legs and the aluminum band across the bottom.
Sliding frosted glass doors on the upper cabinets.
Ahhh... this is the base cabinet that will hold the vintage Thermador cooktop. Note the aluminum trim piece sticking out. That will overlap the cabinet that will extend the cooktop counter and hold the under-counter microwave.
Haley was so very excited... we had to get out of there. So we went out to breakfast and to the store to pick up some orange plastic spray paint for the pads on our Burke chairs (they were originally orange, but had been sprayed light blue. We would like them to be orange again). It was a good diversion.

This is what we saw when we came back 2 hours later.


The floor slants, the walls are a little bit wavey, and the beams aren't exactly the same so there was a fair amount of noodling needed to get things level and fitting properly. The height adjustable legs helped make things easier. These guys really know their stuff and were totally up to the challenge.

This was our first view of how it was all going to fit together. Those upper cabinets really set things off... as do the legs.
(note: they originally made the back of the cooktop/spicerack cabinet go all the way to the floor. We wanted everything up for a more cohesive look and allow light from one room to spill into the other, so they removed the spice rack, took it back to the shop to cut and trim it down.)

The sliders of the spice rack are paint grade plywood that Haley and I will paint to match our drawing at the top of this post.
All cleaned up with temporary melamine countertops tacked in place. They will work until we decide on the right solid surface counters (right= affordable and good looking).
The sink will go where the blue paper towels are, and the hole on the left will be filled with the under-counter microwave.
This is my favorite view. Those holes will be covered by the backing that is attached to the spice rack, which was removed to trim 8" or so off the bottom. The wood sliders under the glass uppers will be painted to match the drawing at the top of this post.
Next, install the fridge, dishwasher, sink, disposer, twin ovens, cooktop and microwave.
Phase 2 will include permanent countertops and the under-counter food processing center thingie.
Tuesday, December 15, 2009

Patching the Tongue and Groove Ceiling

This is one project that hopefully no one will ever notice.
If you're a regular reader of this little blog, you may remember reading something recently about how after we moved a beam, a section of the ceiling needed attention. (Here's a refresher.) The 2X6 tongue and groove ceiling is solid, but there's this issue of a 3"X3' galvanized metal strip held in place with a bunch of screws.

The solution? Re-skin that section. It will be 1/2" lower than the rest of the house, but since that particular section will have floor-to-ceiling cabinets, I'm hoping it won't be noticable... IF the wood grain and cut are right and the stain color is a match.
Let's see how it worked out.
First of all, off to Home Depot for eleven 1"X6"X10' boards of similar grade as the existing ceiling (similar in grain pattern, number of knots and smoothness... I gotta say, the existing ceiling has some pretty rough cut areas and we weren't able to match that, but I think the boards we got were close.) Home Depot cut them all down to 5' lengths. The existing ceiling boards are 5" wide with a 45° angle cut on each edge. I pulled out my handy-dandy little table saw and went to work. First step, rip 'em all down from 5 3/4" wide to a true 5" wide.
(We were experiencing record low temperatures in the greater Portland area... 14° at night and 4-5 days of below freezing high temperatures. Brrrrr!) After all 22 boards were now 5" wide, it was time to cut a 45° bevel on each side.
I survived with all 10 fingers intact!

I also had to account for the metal strip we were trying to cover up in the first place. I took about 10 of the boards and notched in a 4" wide dado so the boards would sit flat on the ceiling.

Finding the right stain was crucial to making this work. Our ace cabinet genius told us that the Miller Paint store in Gresham had a guy that had years and years of experience. We took in a section we had already cut out for one of the new light fixtures, a sample of the wood we would be using and this is what they came up with.

Then we had to start with the staining. It was much too cold to stain outside and the garage is packed with family room and office furniture. So I spread out a bunch of newspaper and started wiping on the new stain. At first, we thought it looked too light, but it seemed to get darker as it dried and one coat seems to have done the trick. (That's a very good thing, because that stuff stinks!) If after living with it for a while we decide that it's too light, we can always apply a second coat of stain... maybe in the summertime when we can open the windows! Looks a little light here, but we decided to put them up anyway.
Our Haywood Wakefield chairs and a couple of old 2X4s make a reasonable drying rack.

Final step... install new boards. The two boards that we had to cut holes in for the light fixture box were kind of tricky, so that was a good place to start. A little work with the jig saw, then nail 'em up. I used 1-1/2" galvanized finishing nails in my little brad nailer.

The rest of the boards went up fairly quickly. We didn't have to go all the way out to the side walls because this section will have floor to ceiling cabinets.
Not bad... hopefully no one will know it's patched once the cabinets are in.

Floor Prep, VCT Installation and Polishing

We had hoped that the floor would be fairly straightforward and simple. I suppose it was, but there were a few things that needed doing that we didn't know would need to be done.

Example: the two pictures below. It looks like John (our expert floor genius... he did the VCT in our loggia & hallway) is smearing a bunch of dirty cement on our crisp & clean plywood subfloor. Well he is because unlike the particleboard sheets he wanted us to use as a subfloor, plywood has grain issues and a few of the joints were either too wide or were splintering a bit.
(We elected to use 1-1/16" tongue & groove plywood instead of particleboard mostly because of structural issues... there was a large crawlspace access hole where the fridge needed to go and a mysterious crawlspace hole in the family room. Frame in a few supports, lay down the super heavy duty plywood and that's one sturdy floor!)

A little dry-time and sanding and the floor was ready for Armstrong VCT.

After the VCT was down... let's polish that stuff! We found a great floor guy (who also works the pro-desk at Home Depot) who does floors on the side. We had him strip & polish the new floor AND the now dirty loggia/hallway floors in hopes that the transition between the loggia and the kitchen would be as seamless as possible.

It reminded me of a pint-sized Zamboni. this machine did the finish stripping and I think layed down some of the wax... I hear it took 6 coats of high gloss wax!!!

And to bring out that shiny finish, here's a high-speed buffer taking care of business in the loggia near the atrium.

The gleaming finished floor. It almost looks wet!!! AND it's super slippery when wearing socks (which makes it perfect for moonwalk lessons).

Thursday, December 3, 2009

Volvo-riffic!

I definitely married into a Volvo family. Here's the proof... (and the XC90 and 544 stayed home on Thanksgiving day!)

Monday, November 30, 2009

Sheetrock finishing

I was conflicted about taking on this remodel challenge.

On one hand, our contractor told us that unless we used the sub-contractor she sent out to give us an estimate (of $1,500... original guestimate was $700), the cabinets wouldn't hang right, we would be unhappy and have to tear it all out and start over, which would cost us even more money.

On the other hand it looked so simple, most of the sheetrock would wind up being obscured by cabinets, tile and/or appliances and I do have a little experience with sheetrock*. After giving all the walls a coat of primer, I'm confident the cabinets will hang just fine.


We painted the beams, too... first the white primer, then two coats of Rodda Oxford Brown.


Today, the finished flooring is being installed. I hear that we're going to need about 75 pounds of floating compound. I can't wait to see how it looks!

*Our first home was a 1912 bungalow. We had a baby on the way and since the upstairs wasn't insulated, I tore into the baby's room to insulate, weather-proof and update some of the electrical. It was a room with angled ceilings, a dormer, double-hung window and a pony wall. Nothing was even close to being square. I ended up having to use a lot of mud to fill in gaps, but when it was finished it looked great and our little baby girl had a nice, toasty space for her crib.

Monday, November 23, 2009

My so-called weekend.

Haley got a bee in her bonnet about getting stuff done. And it's a good thing too, because we went almost a whole week without any progress at all. Anyway, after a few phone calls and a few trips to our local Big-Box Home Store I had a very busy weekend planned for me. Here are the highlights:

Saturday- Subfloor! We will be installing VCT just like this, so an absolutely smooth surface is required. Any teeny tiny imperfections will transfer through and since we have many imperfections, we went with 1 1/16" thick tongue & groove plywood. It's THICK and heavy, but the height should match up with the other finished floors, and with the number of ringed nails we used, I don't think that floor is going anywhere for a long long time. It feels SOLID!


As many of you who have stopped by may have noticed, our home is NOT level... the back left side of the house has sunk a few inches. It's not really noticeable with furniture in the room, but when it's empty you feel like you're here, or maybe here. Okay, it's not THAT bad (if it was, we could charge admission!) but having some really heavy, not so flexible subflooring will sort of help everything even out. At least that's my hope.

Our original flooring "guess-stimate" was $700. The first bid was for $7,500 with $4,500 of that going to subfloor installation! Huh?!! Another bid came in at a much more reasonable $1,500. Still eager to save, and considering I already have subfloor experience, we decided to hire a couple of very able handymen, I would chip in where needed and we would just get it done. We wound up spending a whopping total of 5 hours and $600 on the subfloor. I still have to float a few areas to close up a few gaps and level out a transition or two, but it will be ready for the final floor to be installed on Monday.

Sunday- Sheetrock! And plenty of it. We had a bid of $1,500 to put in the sheetrock. That's just kooky! I bought $100 worth of sheetrock, another $100 for tape, mud & screws and asked a couple of amigos to spend a Sunday getting it up on the walls. Between the three of us it's up, and it looks great. Out handyman pal came in on Monday to handle the mud & tape duties and voila!... we saved a cool thousand dollars.


It's a good thing we handled this ourselves, because when the time came to pull off the old water valves, we discovered they were very very corroded. The valves themselves were not too horrible, but the threaded metal thingies they were screwed on to were beyond saving. We had to heat the connection up, clamp on Vise-Grips and unscrew them by tapping with a hammer. The replacement ones I got are brass, so hopefully further corrosion won't be a problem.


We are still over budget and it looks as though a few things will have to sit on the "to be installed when funds allow" list: drawer microwave, in-counter food processing center, and ??

We haven't decided on countertops yet. Formica is cheap, Coran is possibly barely affordable, and quartz is too expensive. (We forgot to include that on our initial estimate list... along with a new sink and water fixture... oops.)

Next... finishing sheetrock & paint/primer.

Happy Thanksgiving everyone!