Sunday, December 19, 2010
Thursday, October 14, 2010
Mid-Mod Dot Rug
With the fall weather sneaking in on us and the over abundance of spider webs springing up over night in the the yard, I've turned my attention back inside. The family room has patiently been waiting for us to complete the projects we started back during the kitchen remodel. (sigh) Just wondering why somethings take so long to complete and once you have them done the list of to-dos doesn't seem to get any smaller? This is the life of a DIY-er.
A year or so ago I found some round rugs at Ikea... ORANGE round rugs! I should have bought them then, but no, I waited. Sure enough the orange rugs at Ikea sold out and were not restocked!
Flash forward one year: Orange round rugs must be a seasonal fall item because they are back in the store! Last Monday night we bought 12 for the family room floor with the idea to place them in a 3 x 4 pattern to create a mod-dot area rug. (Approx. 7' x 10')
Since they are going directly over VCT flooring I was concerned that they would slip around on the waxed floor. Fortunately we found some none skid mesh that keeps the rugs from moving. And, oh my, they work great. Those circles aren't going anywhere... I really tried to get them to move once they were down. Even took a running start to see if I could skid across the floor. Nope!
Up next in the family room:
1. Finish trim
2. Install ball lights
3. Install sound system
4. Recover sofa sectional
5. White laminate side tables and coffee
6. Buy plant for corner by TV.
7.
Friday, June 11, 2010
Still busy... I swear!
I know it's been quite a while since we added anything here, but don't be fooled... we have been busy.
We've decided to tackle the back yard, and there's a lot to do. We'll post drawings and other info as we get it, but for right now... I got the barbecue cleaned up and we'll be smoking up some spare ribs on Sunday. :)
ALSO on Saturday June 19th, Haley and I have been asked to give a presentation on local organizations & resources at an event put on by the Architectural Heritage Center in Portland called "Mid-Century Modern and the Recent Past: Documentation and Preservation."
We were also asked to participate in a panel discussion. It's an all-day event and we're really looking forward to it. Here's a link and the low-down.
Rejuvenation is sponsoring “Mid-Century Modern and the Recent Past: Documentation and Preservation” at the Architectural Heritage Center on June 19th, 2010. The Architectural Heritage Center is a non-profit resource center for historic preservation.
Event Summary
What: Mid-Century Modern and the Recent Past: Documentation and Preservation
When: Saturday, June 19, 2010 10:00 am - 4:00 pm
Where: Architectural Heritage Center 701 SE Grand Ave. Portland, Oregon
Cost: $20 (Includes lunch)
More Information: Visit the AHC website or call (503)231-7264
Wednesday, March 31, 2010
Closet Doors
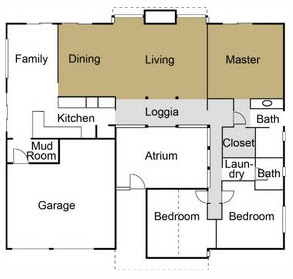
The first week after we bought the house we ripped out the gold-mirrored, floor to ceiling closet doors in the hallway and promptly threw them in the dumpster! Whew.... But wait. We had nothing to replace the doors with. Consequently, we have been staring at our junk pile in the closet for nearly 3 years. Now, it wouldn't be so tragic except for the fact that the hall closet is prominently positioned in the front hall right behind the glass wall where our tiki fountain focal point sits in the atrium. Doh!
 I started my search for door options. Flush panel, floor to ceiling doors were the easiest and most affordable option, but they seem too heavy and dark for the small, dark area at the end of the hall. Hmmmm. Then I found this photo of a shoji screen door design and knew that was an excellent option. Now, where do I get them?

We really like the natural look of the panels in this photo, but most shoji screen closet doors I found have glass panels. Time to get creative!
Several years ago I was given a roll of grass cloth wall paper. (Thanks, Ty!) At the time I didn't know what I would use it for... I just knew that I loved the look and would find a way to use it in the house. Grass cloth paneled doors are just the thing I need for the closet! We contacted our favorite door supplier to see if we could get the doors made without the panels. Then we could make and insert our own panels covered in grass cloth wall paper! Easy.
Apparently, I am developing this nasty habit of asking for things that are nearly impossible to create. And if it can be built, it will cost a fortune! Once my eyes stopped burning from viewing the door frame bids (seriously, ranging from $1400 to $2200 for ONE SET of 60" x 92" closet doors... just the frames...OUCH!) I started drawing up plans. Steve has tools and skills. I knew he could make these frames.
Here's the plan:

Supply List:
6) 3" x 8' Hemlock boards
2) 28" x 88" Masonite boards
2) cans of spray adhesive
1) roll of grass cloth wall paper
1) standard closet hardware kit
1-1/2 inch brads
1/2 inch staples
primer paint
oxford brown paint
utility knife

Simple frame construction. These are fairly light weight so they didn't need to be over-engineered. Steve just toenailed the pieces together with 1-1/2 inch brads.

Primer coat on.

Final coat of Oxford Brown. (2 coats)
 Preparing to spray the Masonite and grass cloth with adhesive. (Hint: I had Lowe's cut the Masonite to the exact size I needed. They offer this service at no extra charge and there's no need to get out the jigsaw or table saw at home. Yay!)

Trimming the panels. We cut the wall paper a bit bigger than the Masonite so we could get a perfect edge for trimming.

The grass cloth panel looks amazing!
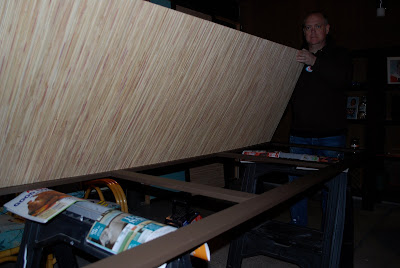
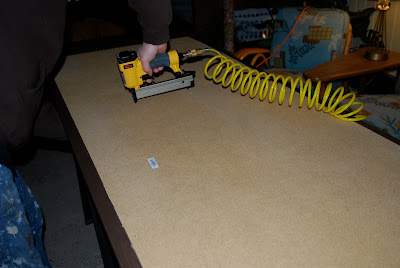
Attaching the panels to the door frames. 1/2 inch staples did the trick just fine.
Installing the the closet door hardware. This is just basic, bedroom style sliding closet door hardware. We didn't show the metal track we attached to the ceiling, but trust me... it was super easy to hang.

The finished doors in place. I've gotta admit that it's much better than looking at all our junk in the closet... and it's far better than the gold and glass doors that were there when we moved in! We still have to put up a piece of trim to cover the metal track that the doors are hanging from, but that project can wait for another day.


Total cost: $75
Time: About 3 hours labor; 4 hours of paint drying
Yeah, I'm pretty impressed with this one. I never thought we'd be making closet doors, but I never thought we'd be renovating a house from top to bottom either!

We really like the natural look of the panels in this photo, but most shoji screen closet doors I found have glass panels. Time to get creative!
Several years ago I was given a roll of grass cloth wall paper. (Thanks, Ty!) At the time I didn't know what I would use it for... I just knew that I loved the look and would find a way to use it in the house. Grass cloth paneled doors are just the thing I need for the closet! We contacted our favorite door supplier to see if we could get the doors made without the panels. Then we could make and insert our own panels covered in grass cloth wall paper! Easy.
Apparently, I am developing this nasty habit of asking for things that are nearly impossible to create. And if it can be built, it will cost a fortune! Once my eyes stopped burning from viewing the door frame bids (seriously, ranging from $1400 to $2200 for ONE SET of 60" x 92" closet doors... just the frames...OUCH!) I started drawing up plans. Steve has tools and skills. I knew he could make these frames.
Here's the plan:

Supply List:
6) 3" x 8' Hemlock boards
2) 28" x 88" Masonite boards
2) cans of spray adhesive
1) roll of grass cloth wall paper
1) standard closet hardware kit
1-1/2 inch brads
1/2 inch staples
primer paint
oxford brown paint
utility knife
Simple frame construction. These are fairly light weight so they didn't need to be over-engineered. Steve just toenailed the pieces together with 1-1/2 inch brads.
Primer coat on.
Final coat of Oxford Brown. (2 coats)
Trimming the panels. We cut the wall paper a bit bigger than the Masonite so we could get a perfect edge for trimming.
The grass cloth panel looks amazing!
Attaching the panels to the door frames. 1/2 inch staples did the trick just fine.
Installing the the closet door hardware. This is just basic, bedroom style sliding closet door hardware. We didn't show the metal track we attached to the ceiling, but trust me... it was super easy to hang.
The finished doors in place. I've gotta admit that it's much better than looking at all our junk in the closet... and it's far better than the gold and glass doors that were there when we moved in! We still have to put up a piece of trim to cover the metal track that the doors are hanging from, but that project can wait for another day.
Total cost: $75
Time: About 3 hours labor; 4 hours of paint drying
Yeah, I'm pretty impressed with this one. I never thought we'd be making closet doors, but I never thought we'd be renovating a house from top to bottom either!
Wednesday, March 24, 2010
Pulling It All Together
Haley loaded up all these pictures. I think they rock... it always surprises me how well our home photographs. Anywho, I'm not sure what to say about these except, enjoy the eye-candy!
Dining Chairs
Well, the Portland Mid-Century Modern League is having the monthly meeting at our house. While it's kinda daunting to be faced with a deadline where tens of critical eyed MCM savvy folks will be moseying around our place, it's sure lit a fire under our collective cabooses.
During the last three weeks we've made a list, divided it into three categories:
1- Would be nice to have finished
2- Really should have this finished
3- Absolutely MUST be finished
One thing in category #3 was refresh the finish on and recover the seats on the dining room chairs.
We like the chairs. They're Heywood Wakefield and they match the table and hutch. But what's the deal with those covers? Ack!
Now... what's next on the list....
Luckily, this seems to be a fairly straightforward project and between Haley, DD and me, we managed to get the chairs looking presentable in one evenings time. If you're in a similar situation, buck up... it's easy.
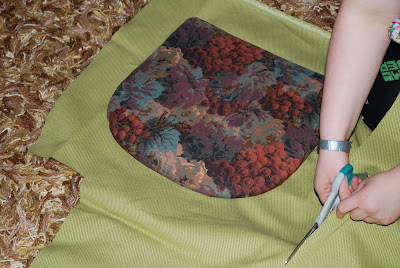
Step #2, cut the new fabric to approximate size. You can trim things after the stapling. The padding was still pretty good, so we didn't take off the old fabric.
This is a perfect time to break out the #0000 steel wool, Murphy's Oil Soap and a little Restore-A-Finish for the scratches.
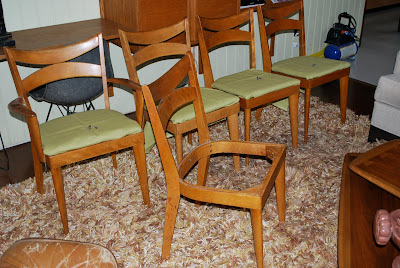
DD folded the new fabric around the edges, stretched things out fairly tight and went to town with the stapler. (Because I'm a tool junkie, we have an air stapler/brad nailer. A regular hand powered stapler will do just fine, but doesn't make that cool "Pa-choonck!" noise.)

Now... what's next on the list....
Sunday, March 14, 2010
Wall Unit Project
4 or 5 months ago, I found a Craigslist ad for a Danish Wall Unit. Their price was very reasonable, but it was in Battleground, WA. Now, I'm not really from Oregon and unless we're talking Tri-Cities or Seattle I kind of think everything else in Washington is just on the other side of the Columbia. I now know that Battleground isn't really close to Gresham.
I contacted the sellers, arranged a time to come look at the wall unit and hit the road after work. I guess it really wasn't THAT far, but the hour drive on a dark rainy night took me by surprise.
When we finally found the place, the wall unit was in pieces, stacked up in a back bedroom in a doublewide and I was ready to leave. BUT upon closer inspection, the pieces were very nice, the hanging mechanism was ingenious, and the sellers dropped the price $300 before I even started any haggling. Soon we had the whole thing packed into the back of the truck and were heading home.
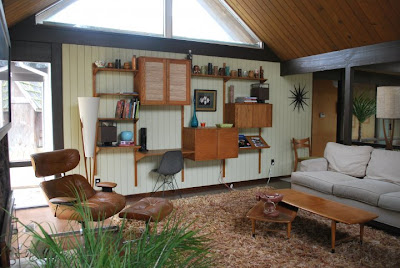
The kitchen remodel was job #1, so we stored the wall unit until last weekend when Haley said, "Hey, let's set up that wall unit today." There are LOTS of pieces. You must make sure things are level AND make sure the shelf hanger holes line up perfectly. It was kind of intimidating.
Here's what we did first:
NOTE: The doors on the upper cabinet are glass. We don't really care for them, so I cut out a couple of pressboard panels, Haley covered them with grass cloth and now they look like they belong. I still need to come up with some way to hide all those electric/speaker wires!
Tuesday, March 9, 2010
I Hate It When this Happens!
So here's the deal; a year or two ago we picked up this Burke table & chair set at Hawthorne Vintage. The table has a tulip base and the four arm chairs have propeller bases. The cushions are original, but when you turn them over....
Now here's where the "I hate it when this happens" thing comes into play. The paint just will not dry. It's tacky. It's been three days now and it's still tacky (tacky as in "Wow, that's sticky!" Not tacky as in "Ewww... that's tacky!"). See... a piece of newspaper stuck to it. YUCK! Was it too cold? Maybe, but it was over 60º in the house. Was there an issue using plastic paint over the existing paint? Maybe, but I don't know about such things. I know it's not too thick as I was planning a second coat. I'm at a loss.
All I know is now I have to spend a few hours with the cushions and a can of paint thinner and a few hundred paper towels and take off the orange and hope they still look decent.
I hate it when this happens. :-(
Subscribe to:
Posts (Atom)


