Monday, October 26, 2009

Tile is gone. Concrete board is on it's way out!

We spent the weekend removing all the tile from the kitchen and office nook. It was really quite the job, and learning from our past experience with the loggia floor we rented an electric chisel. Steve got to work on it and he made it look so easy. So I thought I'd give it a try... NOPE! That thing had to weigh about 40 pounds and I was only good for about 3 tiles before my girlie arms gave out. So I turned it back over to Steve and he made quick work. I demoted myself to debris hauler... carrying bucket after bucket of broken tile to the dumpster. (Sadly, I was still sore from that little job.) Steve's hands were thrashed after wielding the power chisel all day, and then he had to hurry off to play 3 sets at Portland's Scream at the Beach. I don't know how he does it all!


Our contractor let us borrow her large crowbar thingy. It worked great for prying up the concrete board and removing the nails. We still have about 1/2 the concrete board left to tear up, but it should go pretty quickly. The boards in the office nook were screwed in so that may prove to be interesting.


The floor guy is coming in tomorrow to measure and order the VCT tile. We are using the same tiles that we put in the loggia. It will really simplify and clean up the look from room to room.

Saturday, October 24, 2009

Hmmmm


QUESTION: Why is my side of the bathroom now the kitchen?

I'm just sayin'.
-Steve

Tuesday, October 20, 2009

Walls Out. Beams In.

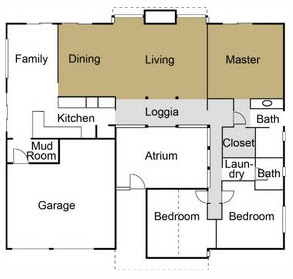
The wall between the dining room and kitchen is gone! (Thanks Steve.) The tiny wall between the family room and dining room (the one with all the tricky wiring in it) is gone, too. A new beam now spans the opening from the dining room to the family room.

The pantry is totally gone (yikes) and the whole space now feels huge and very open. I know that it will close up a bit as we put the drywall up and cabinets in, but it seriously looks like a new house. Here are a few pics to show the progress.

The pantry is really gone:

View from the dining room:

View from the family room:

View from the loggia:

New beam with all the wiring hidden inside:

Replacing the beam by the eliminated pantry proved to be a little challenging. With the new beam secure, our beam guy took out the old shorter beam. That shorter beam was the main support for a few of the tongue and groove pieces. But that's not a big concern because tongue and groove lends stability... except for the section where the short beam was hiding 3 boards butting up against each other. Ugh! We ended up installing a metal support strap to hold those boards together. Now, we need to re-skin this small section of the ceiling. Since it's sandwiched between the beams, it shouldn't be too challenging to blend it with the rest of the ceiling. We haven't been able to locate 1/2" x 6" tongue and groove, but Steve has some creative ideas for this project. I'm looking forward to seeing what he does.

The new beam now lines up with the beam in the dining room:

Ceiling boards where old beam was:

Metal strap screwed in place to stabilize the 3 boards in question:
The beams are in and secure. Next project... the floor!

We've found a cabinet guy!

Yep! It's true. Met with Norm Dickinson yesterday to go over the cabinet design. He stayed for 2 hours discussing all the details, finishes, and options. He was very reassuring. He believes this job to be fairly easy and has no doubts that he can translate our vision into a real kitchen. Since he is the one actually making the cabinets, I am very relieved and have no anxiety. (That's a good sign.)

Bonus Points: he fell in love with our 11" x 17" color print out of the kitchen from Case Study House #22. He asked if he could take it and put it up on his shop wall. YES!


Also, Steve completely removed the wall between the kitchen and dining room last night. It is so open now. Beam guy should be here soon to finish up the beams and ensure the posts and tongue and groove ceiling are structurally sound before we proceed.

Monday, October 19, 2009

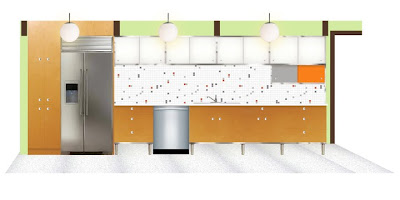
Color Renderings of the Kitchen Design

I seriously don't have the time to be playing around in Photoshop, but I can't help obsessing over the kitchen design. A new cabinet guy is coming out today to take measurements and we are very excited that he understands the style we are wanting. I created these renderings from Steve's design to ensure that everyone is on the same page with the design concepts. We'll see how the meeting goes today. (Fingers crossed.)


Here are a couple of back splash ideas... We are at a complete loss as to what to put there. All white seems too "white", but we do not want it to be busy. We've had fantastic luck with the Hakatai mosaic tiles on our bathroom and pool projects, but I'm not sure it's right for this space. Please let me know if you have any brilliant ideas!

Saturday, October 17, 2009

Quick Project Detour

So, when our electrician was in the crawlspace stringing Romex, he noticed that there wasn't any support under one of the posts. There was support within a few feet on either side, but yeah, there should have been a post in the crawlspace under the post. Haley and I decided that it would have been a very bad thing for us to finish the kitchen only to have it start sagging.

NOTE: You read correctly, dear reader... our Rummer is equipped with a crawlspace. Most Rummers (and Eichlers) are built on a slab foundation with radiant heat. I think because our lot is on the side of a hill, a regular crawlspace foundation was needed. In many ways it's a good thing (stringing wires is MUCH easier), but radiant heat would be nice.

Did I mention that the crawlspace is about 12" tall in spots with WAY too many furnace ducts, electrical wires (some hot, some not), many many feet of phone wires, damp dirt, vapor barrier, insulation and evidence of mouse habitation? Well it's not a happy place. I even put on some fashionable Tyvek coveralls. In fact, as I lowered myself into this cramped, dank DIY Hell, Haley and I agreed that a code word was a smart idea should I need immediate emergency attention. Because I was toting a 50 lb. block of concrete through the maze of stuff I knew there would be grunting, groaning and an occasional curse word uttered. "Barbie, call 911" seemed to be an effective unmistakable code phrase.

So I (as quickly as possible and without uttering a single word of the emergency code phrase) installed a 4x4 post in the right spot. Not my idea of a great way to spend a Saturday morning, but it had to happen. Thought you might like to see a pic or two. The kitchen work resumes in earnest this evening and tomorrow...
I gotta go take a shower.


Thursday, October 15, 2009

Electrical Plan

I must admit we have a huge fear of electricity... probably a healthy fear. (In a previous house I had a bad experience with electricity. And that's all I have to say about that.) Much of the wires and outlets are staying in place, but there are a few new things we've added in the design, and a couple of light fixtures that needed to be moved. (Tricky, given the flat roof and tongue and groove roof decking.)

Here's the most recent electrical plan. (Note: we've since eliminated the can lights over the ovens and refrigerator... our electrician was able to tap into the other lights and add a new one centered in that section of the kitchen. So now we'll have 4 ball lights in the galley instead of 3!)


Electrical Challenge #1:
We are removing the wall between the kitchen and the dining room, but the beams didn't line up. Huh? Well we better fix that, right? Right! And it sounds simple... the beam in the kitchen (it's white in the pic below) is offset by about 11 inches, so we only have to put in a new beam in the new spot that'll line up with the dining room beam. You can see in the photo below where the brown dining room beam ends... imagine it continuing along it's line and the white beam going away. Now notice where the light box sits. Welcome to the dilemma du jour.


I just added this pic with a highlighted area showing where the new beam will be... notice how it partially overlaps the light box.


Question: Can you move a light fixture on the flat roof/tongue and groove decking without going through the roof itself?

Answer: Yes!

Our electrician pulled out the offending light box and discovered that the decking was channeled for the wiring. He successfully moved the 2 lights and added another... so now all four sections of the kitchen will have a ball light centered between the beams. Beautiful!


Electrical challenge #2:
The new design has two walls removed to open up the kitchen to the dining room. Unfortunately, those walls are so full of electrical wire it looks like a fishing net. Some of the wiring extends from the ceiling lights in the family room, so we have to keep them. The contractor and electrician wrinkled their noses and said it was impossible, but we stood firm with the design and encouraged them to come up with a solution. Our stubborn homeowner persistence paid off and we were able to remove the walls and save the wiring. How? Our problem solving electrician bundled the wiring into a nice, tidy group and attached them to the ceiling and one of the beams. The beam guy cut a channel in the new beam that will extend over the removed wall. And presto... wall is gone and all wires are hidden in the beam.


Monday, October 12, 2009

Gonna rip it up!

Hammers, crowbars, Reciprocating saws, OH MY!
Y'know, when you watch one of those home shows and see a goofed up remodeler or high-heeled flipper swinging a sledgehammer on a "never-been-updated" kitchen, it always looks like they are having the time of their life. Wild eyed. Shards of sheetrock flying everywhere. Giggles and grunts. They make tearing out an old kitchen look like it's more fun than a pocket full of squirrels.
Well I don't mean to shatter any illusions here but... it's work! About 100-million screws, and 1/3 of which stripped out the second I touched them. Screwed into the floorboards, screwed into each other, screwed (and glued) onto a ledgerboard that was also screwed into the studs. I had to use everything from Vise-Grips to a reciprocating saw to do it, but the cabinets are now all outside under a tarp.

I suppose it would have been easier and more satisfying to just start swinging the sledgehammer, but although we don't care for the design of the cabinets, they are well made and are in decent shape, too. I'm sure someone else will want them, so we're donating them and the appliances to the Rebuilding Center in Portland.


The ghosts of wallpapers past!
A little urban archeology for your amusement.
Grossest thing ever!
Mice! When we moved one of the base cabinets, we discovered a mouse-mini-metropolis made of insulation and mouse poop. Learn from this, dear reader... seal up every possible entry to your house no matter how small, or these little varmits WILL find a way in. And while they are kinda cute, they smell BAD and can spread disease. You DO NOT want them in your house!!! Haley somehow managed to supress her gagging long enough to hold open a trash bag while I used two other bags as gloves and scooped away the mouse unrine soaked insulation, and about 5-10 dead mice. (YUCK! I guess they had been poisoned or something.) Then I used the Shop-Vac to clean up all the smaller bits. Yuck Yuck Yuck!

Sheetrock removal

This was actually kinda fun... dusty, but fun. After making a few initial holes and making sure the power and phone outlets were clear, we started pounding, prying and pulling away the sheetrock. All four of us got into the act and a sort of contest developed to see who could pull away the biggest piece. There is now Mount Sheetrock in the middle of the floor just waiting for the dumpster to be delivered today (it'll be a regular family style sheetrock bucket brigade tonight!).
The sheetrock was hiding some interesting things.
-It became clear where the new kitchen beam needs to be placed in order for it to line up with the existing beam in the dining room.
-There wasn't any insulation in the water vent portion of one wall (used to build Mouse-Metropolis, no doubt).
-When a previous owner had opened up a pass through from the kitchen to the dining room, they did a very poor job in shoring up the studs they cut. Two of them were literally unattached and wobbly. Good thing it's not a load bearing wall!
-There is now an amazing view of the back yard now from the kitchen. We are very pleased with our decision to open things up a bit.
...stay tuned.....