Well, it's almost finished. And it's only been 18 months!!!
As regular readers may remember, way back in November of 2007 I made the stomach-turning, ever-so deflating discovery that the toilet in the kids bathroom had been installed incorrectly.
If you'd like to see pics and read the long version, click HERE.
Memory Refresher: During a previous owner's misguided '80s "update" (complete with particle board, fall apart vanity), the old vinyl sheet flooring had been covered with super-thick ceramic tiles. Fine, except they didn't raise the toilet flange or even double up with another wax ring. There was no watertight seal... there was a gap. A gap big enough for me to see water seeping out between the toilet and the floor when I flushed. This discovery made me very unhappy. I could only imagine what damage many years of unsealed toilet flushing had had on the subfloor. Suddenly the kids bathroom jumped to the top of the list of things to remodel.
Since the bathroom is attached to the laundry room (As seen here in the floorplan), it just made sense to redo the needful laundry room at the same time. After a long period of researching flooring, tiles, vanities, mirrors, light fixtures, trying to accommodate contractor's hours, budgetary considerations and a ba-zillion other things, I was beginning to wonder if we would ever get it functioning again.
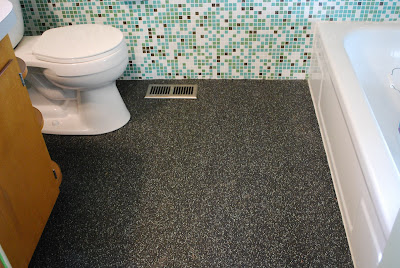
Floor: EcoNights Rubber Floor (color: Monster's Ink)
Plus: Looks great. Feels great under bare feet. Is 100% waterproof (see toilet installation below). We like it!
Minus: One seam, but is almost invisible. $$$
Satisfaction Level: 10

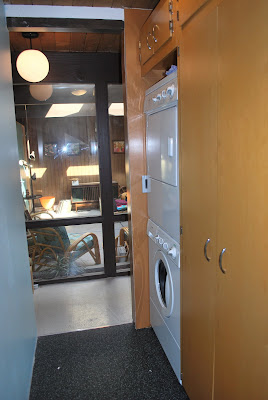
Laundry Cabinets: Custom built to fit space and match the vintage vanity.
Plus: Matches the bathroom vanity very very well. Provides much needed storage. Looks great from the front door.
Minus: A few dings. There's some kind of scratch or de-lamination happening at the bottom of one of the tall doors. I think there's too much of a gap over the stacked washer/dryer. $$$!
Satisfaction Level: 7

Laundry Light Fixture:
Plus: Low profile & simple. From IKEA and only cost about $10.
Minus: Because of the new cabinets, there wasn't clearance for another hanging globe light to match the hallway, but this seemed like a good solution.
Satisfaction Level: 8
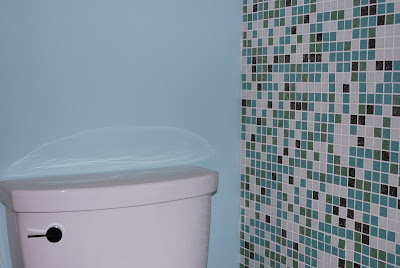
Laundry & Bathroom Paint: American Signature Colors (SR904 Shallow Pool)
Plus: Looks good with tile & floor without trying to be too matchy-matchy.
Minus: Nothing... it's paint.
Satisfaction Level: 9
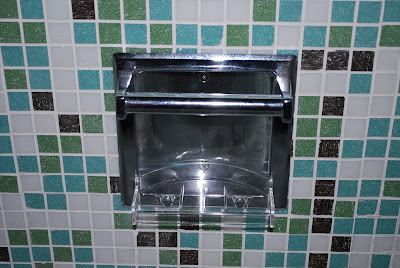
Bathroom Tile: Custom blend from Hakatai
Plus: Opaque glass tile from Hakatai. Much more affordable than other, more trendy sources. Located in Oregon. Able to handle a custom blend for our mosaic. Looks great.
Minus: First-timer "Do-It-Yourselfer" installation is evident in spots.
Satisfaction Level: 9


Bathroom Vanity: Vintage find! (Thanks Heather!!!)
Plus: 1950s craftsmanship. Free! Saved by a friend from the scrap heap (Thanks again Heather!). Love the curved shelves and the very unique sink. New Formica countertop pattern looks great.
Minus: Our contractor charged us $$$ to take 6" off one end and install the countertop. There are a few "age-spots" in the finish (might not even be a minus as they add character).
Satisfaction Level: 9
Toilet: Kohler Cimmaron round bowl
Plus: New. Reliable. Properly installed by me.* Looks just fine.
Minus: New.
Satisfaction Level: 8
*I had a bit of an adventure when I thought I had the water turned all the way off and cut the copper pipe to install a compression fitting. In the time it took me to run screaming back out to the street and turn the water ALL the way off there was time to spray almost 1/4-inch of water onto the new floor. Both the rubber floor and myself are indeed waterproof and cleaned up nicely.

Bathtub:
Plus: Original to the house. Free!
Minus: There are a few chips, but I've fixed them with a that enamel touch up paint stuff and they're very hard to see.
Satisfaction Level: 8
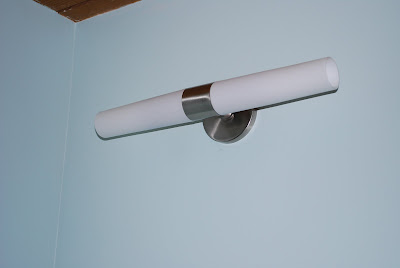
Bathroom Light Fixture: (See earlier post on bathroom lighting)
Plus: Great, classic design... George Kovacs!
Minus: Was weird to install and it only uses these strange skinny light bulbs.
Satisfaction Level: 9
Still To-Do List:
Mirror - We're looking for a simple, classic Nu-Tone mirror that's the right size.
Sink backsplash - The new countertop wasn't scribed to fit the space and we had to wait for a newer layer of Formica to be installed over the new sheet in order to cover the 1/2 inch gap. It's on now, looks fine and we'll get getting on with operation backsplash soon .
Shower Curtain - Haley had a GREAT idea for this inspired by those ceiling mounted privacy curtains hospitals use.
Frosted window film - No mini-blinds needed.
Finish Trim - Window trim, door trim, baseboards & corner trim.
Lessons Learned
1- Shop around for a cabinet maker. We didn't and got over-charged.
2- Make sure the water is really turned off before you start wielding a pipe cutter.
3- Set deadlines for yourself. For us anyway, things are much more likely to get done when there's a hard deadline involved. If it's one of those "Let's get that finished sometime soon," things it becomes very easy to put off.
4-I'm sure there's more. I'll post more in the before 'n after write up once it's all done!
I know we were all hot for tea-green fixtures, but the expense of replacing (or refinishing) a perfectly good white bathtub just seemed extravagent, especially after the cool sink in our rescued vanity was also white. In the end, I'm quite satisfied and I think green or blue appliances would have been too much for the space.
I know we were all hot for tea-green fixtures, but the expense of replacing (or refinishing) a perfectly good white bathtub just seemed extravagent, especially after the cool sink in our rescued vanity was also white. In the end, I'm quite satisfied and I think green or blue appliances would have been too much for the space.


